
[com1walkthrunav]
Floor 1 – Traverse Town
Field Event: Control TutorialObjective: Complete the correct actions when prompted.
Using all of the Cards in your Deck are used up, you can hold down the A Button to initiate a Reload. Each time you do this, 1 Point will be added to the Reload Counter, meaning it will take longer for your Cards to return. While you’re battling throughout the game, keep an eye out for green Friend Cards that appear on the battlefield. If you pick them up, you can use them to summon allies to your side to aid you during the fight. |
 This tutorial is just to show you the basics for controlling Sora so you can easily tackle Castle Oblivion and the challenges that await you. Move using the D-Pad. You can jump by pressing the B Button. Pressing the A Button will allow you to use Cards in your Deck while you’re in a battle. The L Button and R Button allow you to shuffle through Cards in your Deck so you can access certain Cards more easily. By tapping the Left or Right Buttons on the D-Pad twice rapidly, you can perform a Dodge Roll to avoid enemy attacks. Pressing the Select Button will allow you to cycle between your Card Deck and your Enemy Card Deck in battle.
Key of Beginnings
Field Event: Battle TutorialObjective: Complete the correct actions when prompted.
Cards with a level of 0 are a special case. If you play the level 0 Card first, it can be broken by any level Card that your enemy plays. If you play the level 0 Card after your enemy has already played their Card, it can break any level Card that your enemy played. In other words, level 0 Cards are perfect for breaking enemy Cards that will trigger powerful attacks, such as Sleights. Speaking of Sleights, another feature to your battle strategy includes Stocking Cards. Stocking up to three Cards from your Deck adds their Card levels together to perform an even higher-level attack. In some cases, you can trigger a Sleight if certain criteria are met when Stocking Cards. Sleights are powerful abilities you can use in battle to gain the upper hand against your enemies. When Stocking Cards, the first Card in the Stock will be removed from your Deck for the remainder of the current battle, so you shouldn’t just rely on Sleights and Stocks to get through a battle, as you will eventually run out of Cards. To Stock Cards, tap the L Button and R Button simultaneously to add a Card from your Deck to your current Stock. When you’ve fully assembled your Stock/Sleight, tap the L Button and R Button together once again to unleash the assault. Completing this Field Event earns you the Simba Magic Card. |
 Battling is a little more complicated than just mashing the A Button to use attacks. Each Card in your Deck has a number 0 through 9 on the bottom corner. This number indicates the Card’s level, and naturally, the higher the Card’s level, the better it is. Each attack you use will play the top Card from your Deck out into the middle of the battlefield. If your enemy also plays a Card from their Deck, the one with the higher Card level will successfully use their attack while the other’s Card and attack will be broken. Keep an eye on your Card levels as you fight and use Cards wisely.
Key to Truth
Boss: Guard ArmorHP: 200 AP: 5 EXP: 48
Throughout the fight, be on the lookout for the Trick Card. Using this Card will not only interrupt Guard Armor’s attacks, but will literally cause it to fall to pieces, allowing you to take out a good chunk of its HP before it gets back up. Victory against the Guard Armor earns you the Guard Armor Enemy Card. |
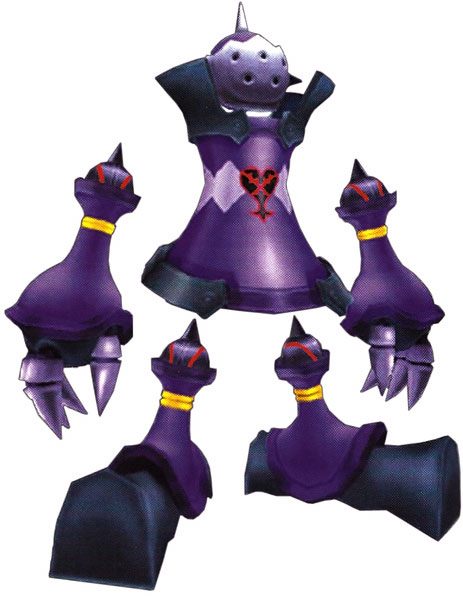 You should have no trouble defeating the Guard Armor, seeing as it is the first Boss in the entire game. It doesn’t attack very often, and even when it does, it uses fairly low Cards that you can easily break. Breaking the Guard Armor’s Cards will also interrupt and completely prevent its attacks, minimizing the damage you will take in this battle.
1st Floor Exit Hall
Boss: AxelHP: 320 AP: 2 EXP: 75
Axel’s worst attack is his most powerful Sleight, Fire Wall. This attack summons an enormous, unavoidable wall of fire that will slowly move across the battlefield. There are two options for avoiding this attack ahead of time however: you can either Card Break it (which is relatively easy if you use a high-level Sleight of your own), or you can try to get behind Axel right when he uses the attack to completely avoid the wall as it travels across the screen. If you do get hit with this attack, it’s not exactly Game Over, but it will deal some pretty decent damage, so be ready with a Cure Card if necessary. Victory against Axel earns you the Fire Magic Card. |
 Your fight against Axel will be a little more complicated than your battle with the Guard Armor. Axel is a swift opponent, making him difficult to actually hit, and to make matters worse, he’s got the element of Fire on his side. This is not just advantageous for him, though, as his use of Fire means that he is also very susceptible to Blizzard Magic. Use of your Deck’s Blizzard Card will help deal some decent damage, if you can manage to hit him with it.
Floor 2 – Agrabah
Field Event: Heartless BattleObjective: Defeat all of the Heartless.
|
 Upon entering Agrabah, Sora encounters Aladdin, who is currently being attacked by swarm after swarm of Heartless. It’s time to lend him a hand! Take out all of the Heartless that appear to progress the story. After clearing this event, a cutscene will play and Sora will receive the Key of Beginnings.
Key of Guidance
Field Event: Heartless BattleObjective: Defeat all of the Heartless.
|
Key to Truth
Boss: JafarHP: 550 AP: 7 EXP: 233
To make matters worse, Jafar will be pummeling you with his own attacks (which typically are rather high Cards). You should always try to Card Break Jafar’s attacks to avoid them, but you will never actually be able to do any damage to him personally. Instead, focus your time and energy tracking down Iago and dishing out some attacks of your own. Jafar’s Cards are pretty high, but a few level 0 Cards in your Deck will ensure that you can always Card Break his attacks. Victory against Jafar earns you the Jafar Enemy Card and the Genie Magic Card. |
 Jafar can be a rather tedious battle. Your target is actually not Jafar, but instead, the black lamp that Iago is holding as he flies back and forth across the room. But it’s not as simple as just hitting Iago, because throughout the battle, the floor platforms will rise and sink, making it difficult to reach him.
Floor 3 – Olympus Coliseum
At this point in the game, we recommend you make room in your Deck for the Jafar Enemy Card. This Card makes it so your attacks cannot be broken, even if your opponent’s Card is higher. This effect lasts for 40 attacks and is a very useful way to prevent enemies with high-level Cards from breaking your Cards.
Key of Guidance
Boss: CloudHP: 320 AP: 7 EXP: 233
Based on our recommendation, you should have the Jafar Enemy Card in your Deck. If you use it, Cloud will not be able to Card Break any of your attacks for 40 Cards in a row. Use this to gain the upper hand and power through. You should watch out for Cloud’s Sleights. Most of them are pretty easy to avoid, but they typically have a very high level. Not to mention if you do happen to get hit, they can really pack a serious punch! Victory against Cloud earns you the Hi-Potion Item Card. |
 Cloud’s attacks are powerful, but fairly easy to avoid. Since most of Cloud’s assaults require him to be perfectly still while he swings his mighty sword, you pretty much dodge everything he has to throw at you. That said, Cloud has a very powerful Deck with a lot of high-level cards. The best way to break through and attack is to use some of the Sleights you’ve collected thus far. You don’t want to rely too much on Sleights though, as you’ll soon run out of Cards in your Deck.
Key to Truth
Boss: HadesHP: 480 AP: 7 EXP: 372
Because Hades focuses on Fire attacks, you should exploit his weakness to ice. Fill your Deck with Blizzard Magic Cards and use the powerful Blizzaga Sleight to really deal some heavy damage. The key to surviving in this battle is to constantly interrupt Hades’ attacks. Use the Jafar Enemy Card to ensure that your own attacks are not broken, especially when the battle starts to get down to brass tacks and Hades’ HP is getting low. You don’t want to rely too heavily on Sleights early on, as this could leave you with limited options when it matters most. Victory against Hades earns you the Hades Enemy Card and the Cloud Magic Card. |
 Hades can be a real pain during this fight. Most of his cards are pretty high-leveled, and his attacks can really eat away at your HP in a rather short amount of time. His two Sleights, Temper Flare and Firaga Ball, are incredibly powerful at this point in the game, so you should always have your fingers ready to perform a Dodge Roll at a moment’s notice.
