
[bbsterrawalkthroughs]
City Under Siege
When Terra touches down in Radiant Garden’s “Central Square”, the Unversed show up to greet him.
Event: Defeat the Unversed
The Tank Topplers are like Bruisers, except you don’t want to attack their front. If you do, they’ll start glowing red and swell up into giant rolling balls that follow you wherever you go. After a while of rolling around, the Tank Toppler will explode, dealing massive damage to anything caught in the blast. Instead, try to attack them from behind and target the water valve on their backs. Doing so will allow you to deal damage without the risk of them exploding. |
 The Unversed in Radiant Garden are much more challenging than in the past, and it’s all because of the addition of two new types. The Chrono Twisters are capable of freezing Terra in place and dealing significant damage that hits you all at once when the Stop effect wears off. You’ll definitely want to take them out as soon as they appear to avoid taking too much damage.
Defeating the Unversed merely allows you to freely explore Radiant Garden, though more Unversed will continue to appear, so be prepared to fight Chrono Twisters and Tank Topplers at a moment’s notice.
Use the eastern exit to head into the “Castle Town” area, where you’ll briefly encounter Merlin. He’s dropped a book, so you should probably go return it to him. Enter his house and speak with him. Examine the book you found to unlock the 100 Acre Wood Command Board.
Pursue the Unversed
Head back outside and you’ll find what appears to be an Unversed wandering its way through the streets. Follow it north into the “Fountain Court” area. When you arrive, it’s gone, but you should still press forward to track it down. Locate the fountain geysers and jump into them to be launched up to the higher platforms and make your way across to the doorway at the back of the “Fountain Court”. This leads you to the “Aqueduct”.
Defeat Unversed in the “Aqueduct” as you climb the stairs to the upper level. The Mandrake Unversed that appear in this area are capable of hitting you with their attacks from extremely far away, so try to stay up on the higher ledge as you travel along the strip. Jump down to attack them only when you have to, then quickly jump back up to avoid being hit too much.
The doorway at the end of the “Aqueduct” leads to the “Reactor” area, where you’ll find the Unversed you were looking for … as well as Ventus and Aqua.
Boss: Trinity ArmorHP: 800 (Each Piece) | STR: 14 | DEF: 6
The Trinity Armor is composed of three separate pieces, which means you’ll need to defeat all three to truly defeat it. Focus on the legs first, charging straight in when the battle begins and unleashing combo after combo. The Trinity Armor will likely launch one of its many energy beam attacks in retaliation, so back off a little and simply dodge around the area to avoid taking too much damage. Using your Shotlock at this stage in the fight it recommended to quickly dispose of the legs. The pieces will break apart frequently and act on their own. If the legs are still in the fight, they will charge across the battlefield at high speeds while the arms emit lightning beams and the head launches small lasers that zig-zag all around. Again, focus on one set of parts at a time until it is destroyed, then move on to the next. The body will be your last target. When the body is all alone, it will fire all kinds of lasers all over the place, which you can avoid for the most part by using your evasion maneuver. It will then charge up and fire a massive beam that will spin around the entire area. You can avoid this attack completely while getting directly underneath the body when it fires. You can even attack it from underneath while this attack is happening. Victory against the Trinity Armor earns you a HP +5 Get Bonus, the Rockbreaker Command Style, and the Disney Town Pass Key Item. |
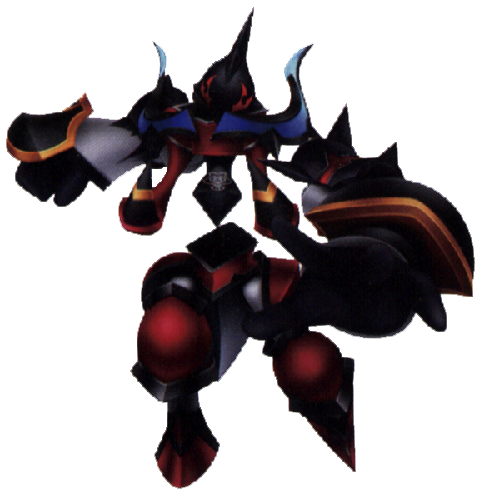 Ventus and Aqua join the battle when the three Unversed pieces combine to form the Trinity Armor. Unfortunately, they’re not all that helpful, so you’ll still have to do most of the fighting yourself.
Master Xehanort, Kidnapped
After a rather sad cutscene in which the three friends have a bit of a falling-out, Terra returns to the “Aqueduct” area, where he encounters a man claiming to have taken Master Xehanort prisoner. Terra’s not all that convinced, but it’s still probably a good idea to check it out. Return to the “Central Square” and head through the southern exit into the “Entryway” area.
Use the save point if you like, then continue through to the “Outer Gardens”. Many Unversed appear here, so it’s a very good place to gain some EXP. The central building houses a staircase that will take you down to the “Purification Facility”. Turns out the man’s claims were true, and he does indeed have Master Xehanort captive.
Boss: Braig
HP: 600 | STR: 14 | DEF: 6
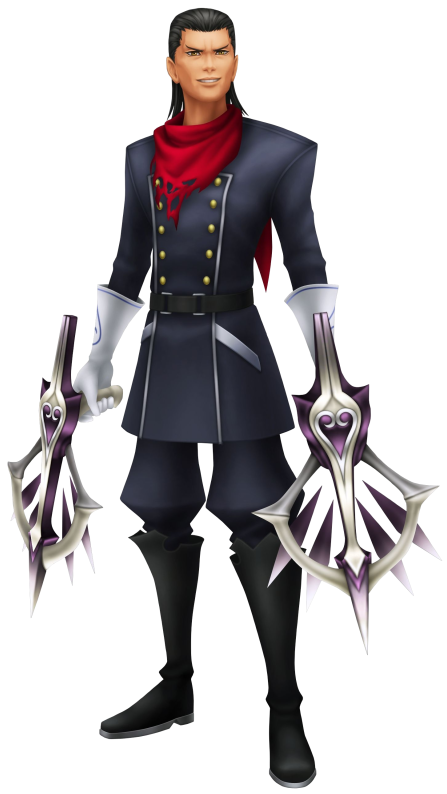 Anyone who has played Kingdom Hearts II and battled against Xigbar should be extremely familiar with the structure of this fight. You start off under the cross-hairs of Braig’s dart gun as he fires off shots from a high-up balcony. You can use the Block Ability to return fire with his own bullets. Eventually, Braig will warp down to the same platform as Terra and you can fight him the old fashioned way.
Braig moves insanely fast, giving you few opportunities to land full combos. Attack with single strikes when openings present themselves, and otherwise rely on redirecting Braig’s bullet shots back at him to deal damage. When Braig stops to reload, that’s your chance to dish out some real damage.
Braig’s worst attack is when he summons an enormous energy bullet and fires. The bullet will ricochet around arena, dealing damage with each pass if it connects, then fade away after a while. Occasionally, Braig will warp back up to the higher balcony to lob long-range shots toward Terra down below. This pattern continues until Braig is defeated.
Victory against Braig earns you a Deck Capacity +1 Get Bonus, the Dark Volley Shotlock Command, and Xehanort’s Report 2.