← Back to All Collectables
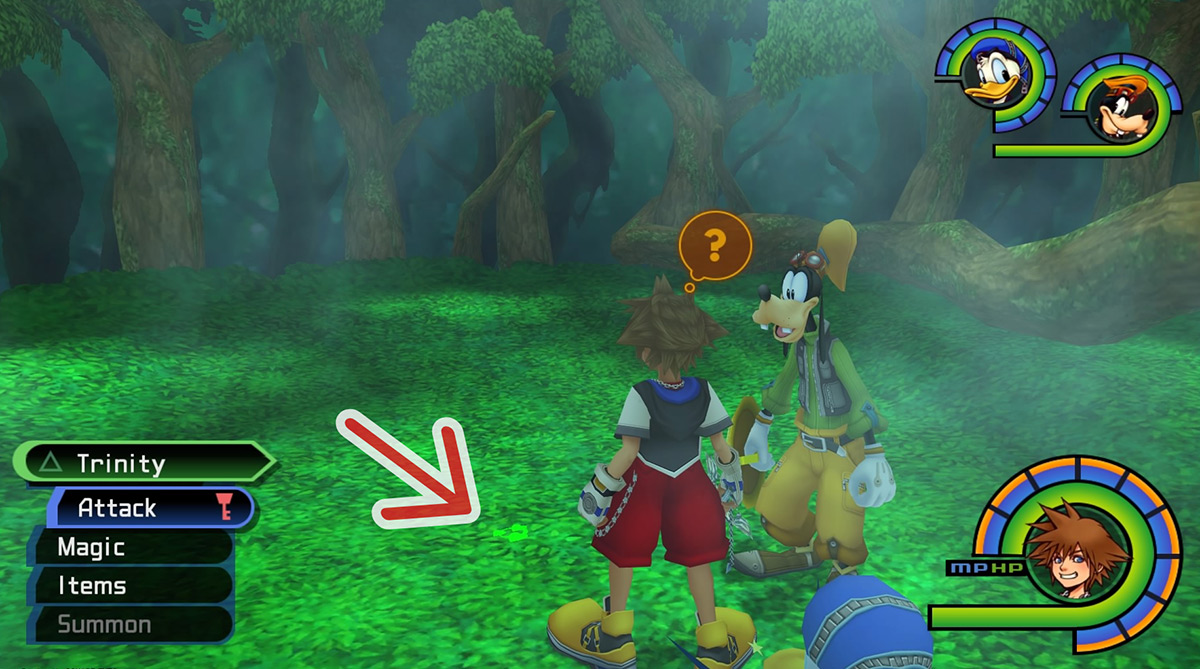
Scattered throughout the many worlds of Kingdom Hearts are small colored symbols called Trinity Marks. There are five kinds of Trinity Marks — Blue, Red, Green, Yellow, and White — and they can be unlocked as you progress in the game.
When activated, Trinity Marks cause one of five effects to happen, depending on the color. The table below shows the effect and acquisition method of each Trinity Mark color:
| Color |
Effect |
Learned |
| Blue |
Trinity Jump: The party jumps high, landing hard in synchrony to cause various overworld effects |
Shortly after meeting Donald and Goofy in Traverse Town |
| Red |
Trinity Smash: The party slams through an obstacle |
After completing the first four worlds |
| Green |
Trinity Ladder: The party climbs to a higher area |
After sealing the Keyhole in Agrabah |
| Yellow |
Trinity Push: The party moves a heavy object by shoving it together |
After completing the Hercules Cup at the Olympus Coliseum |
| White |
Trinity Touch: The party touch their weapons together to cause various overworld effects |
After the first battle with Riku in Hollow Bastion |
Below we’ve detailed every Trinity Mark location ordered by world. But if you are looking for all marks of a certain color then you can use CTRL+F to search the page (on mobile it’s “find on page”) and you can search for the color by name.
Each Trinity Mark spot below includes the color, a screenshot of the location, and what you get by activating that trinity.
Locations of All Trinity Marks
Traverse Town
| Color |
Area |
Outcome |
Screenshot |
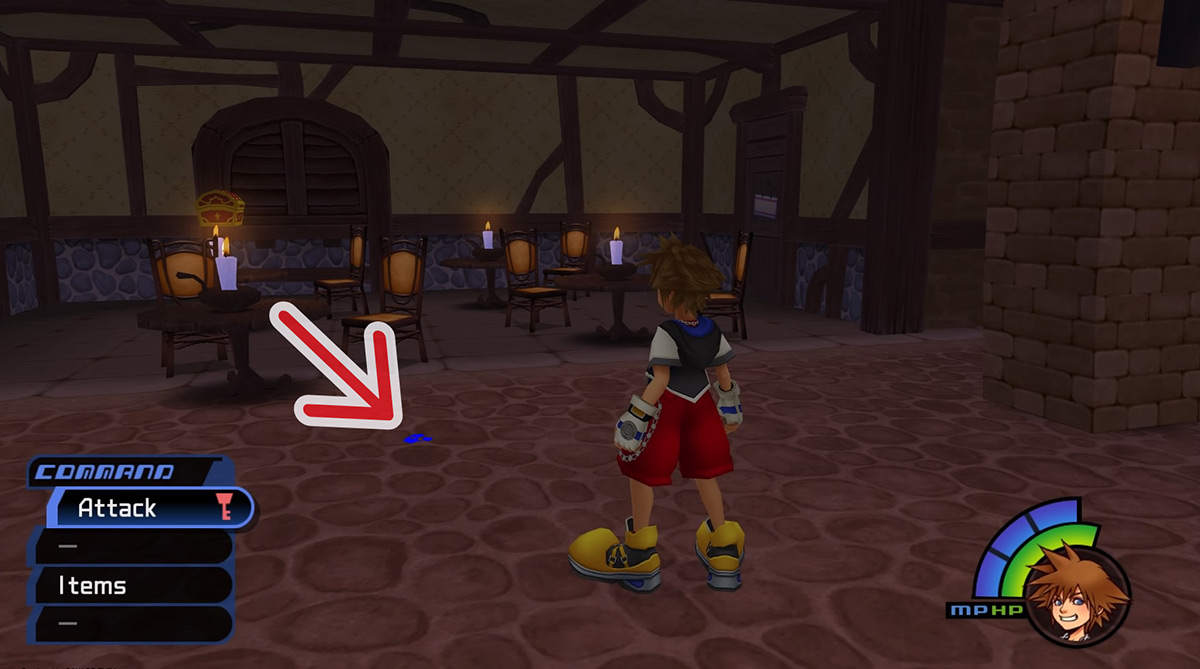
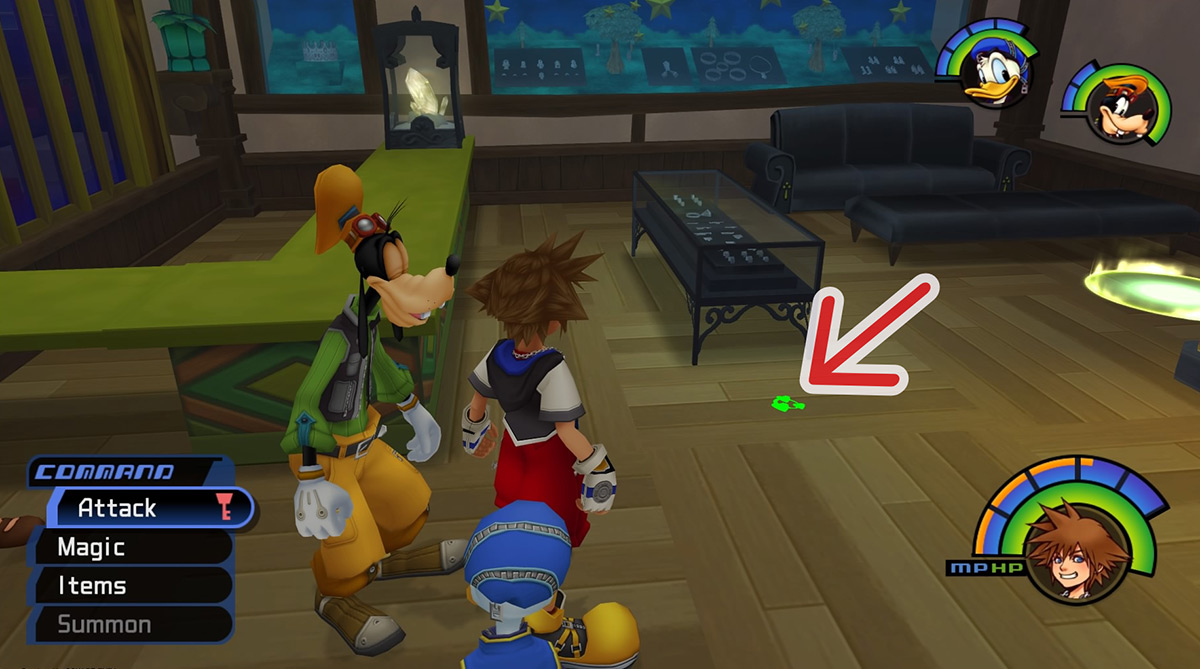
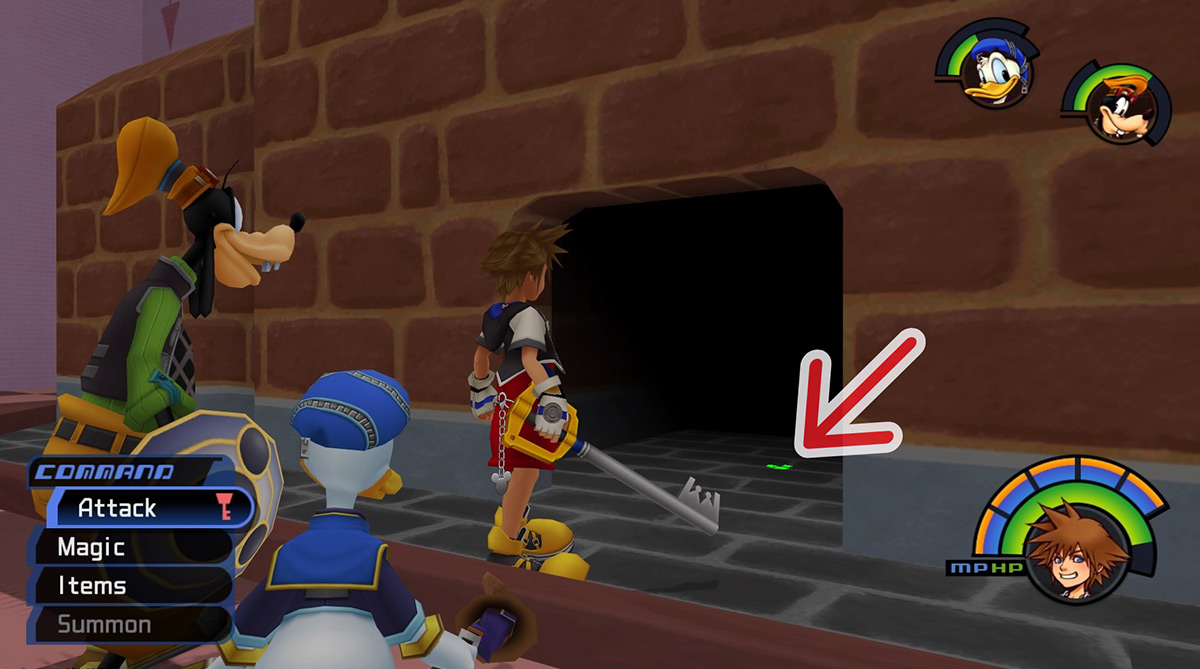
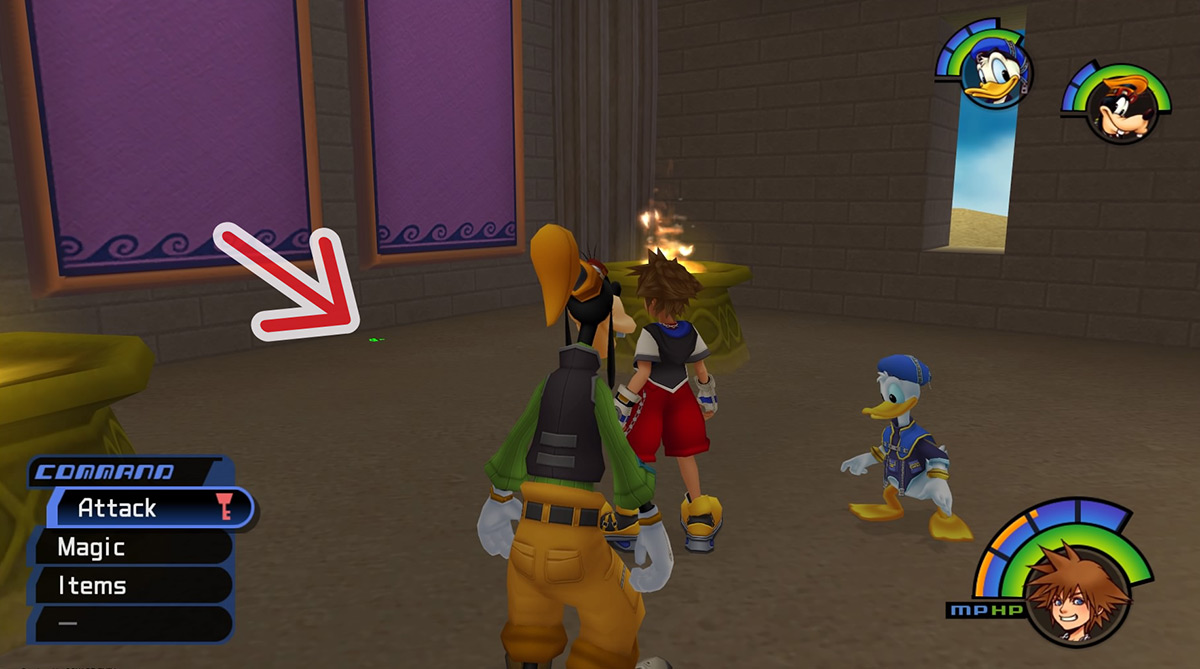
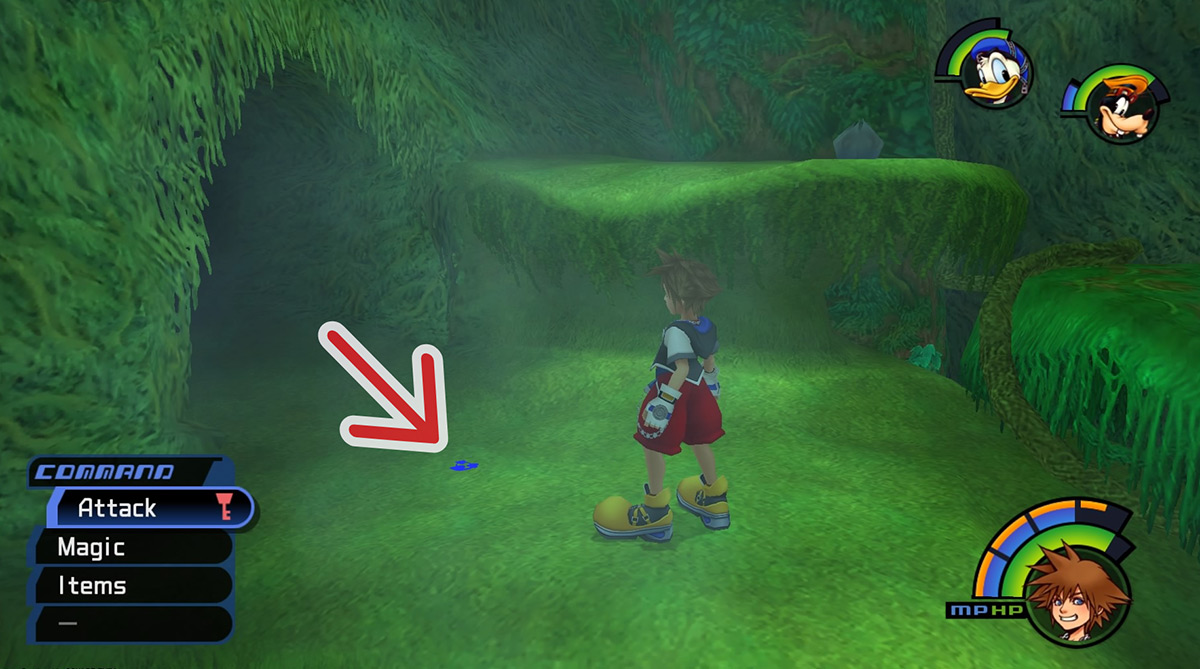
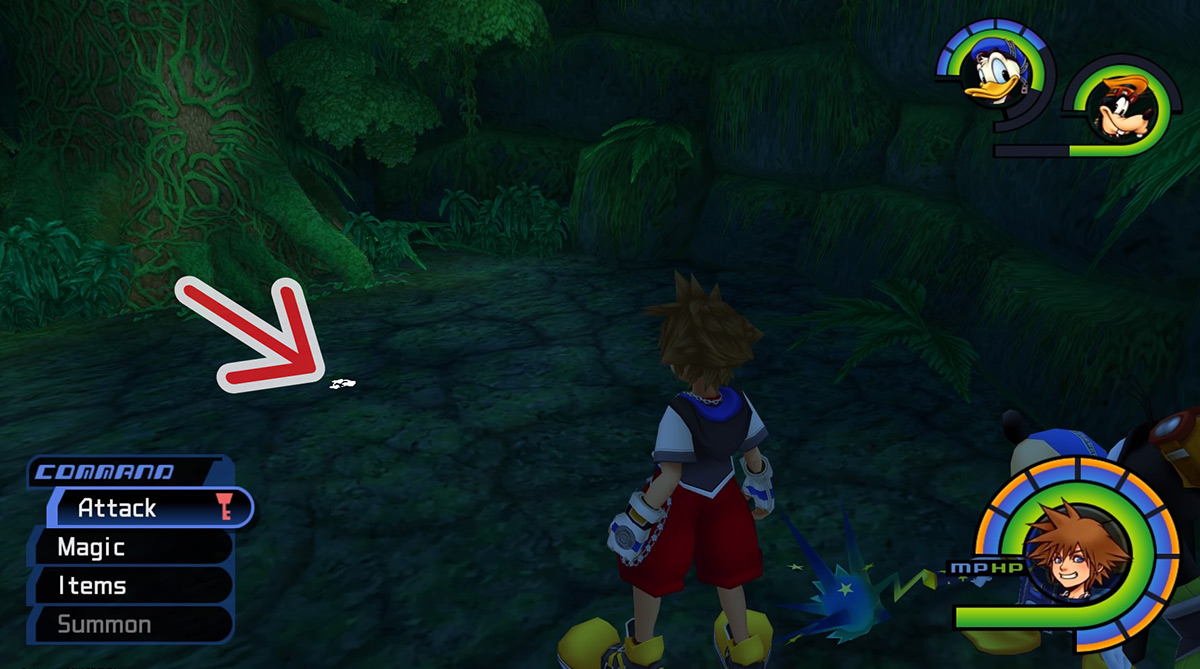
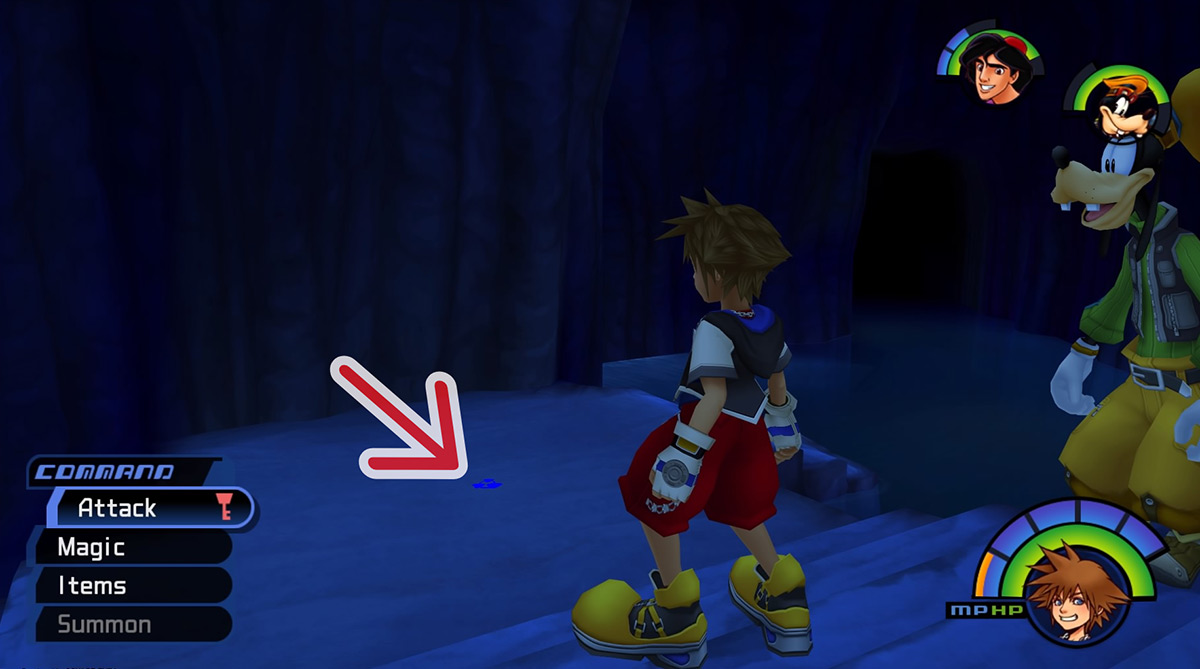
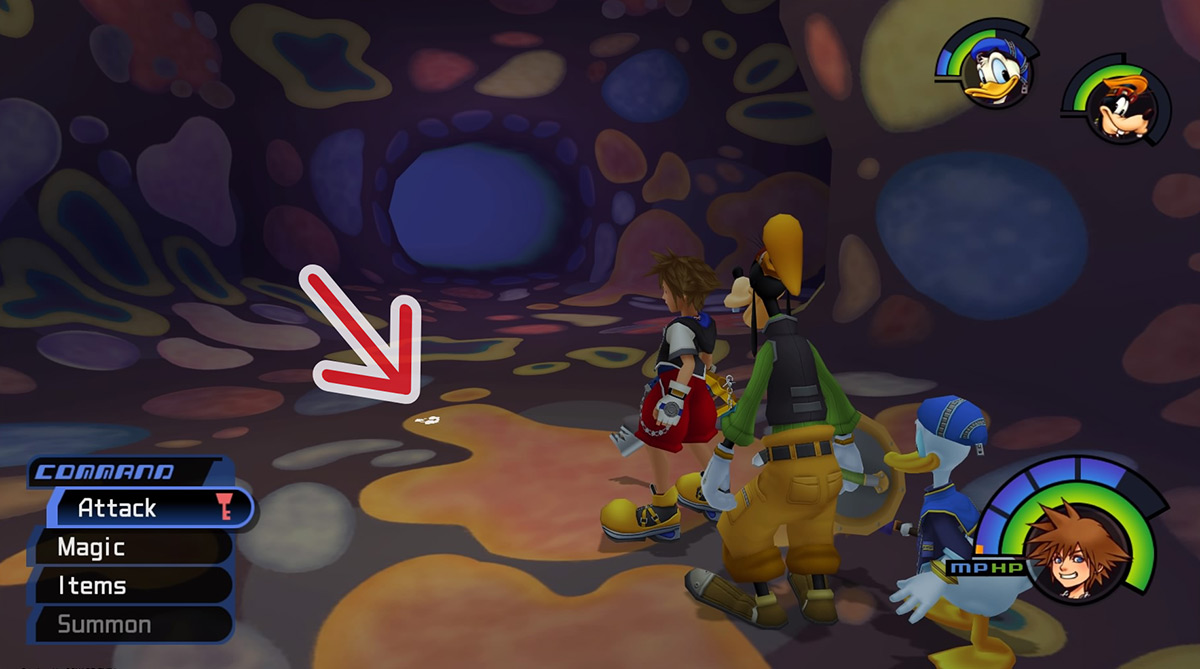
| Blue |
First District – Café |
The party teleports to a room upstairs, where a Postcard can be found in a chest |
 |
| Blue |
First District – Near the world exit |
The party slams the ground, revealing 120 Munny |
 |
| Blue |
Third District – Behind the fountain |
The party slams the ground, revealing a Camping Set and 60 Munny |
 |
| Blue |
Magician’s Study – Near the save point |
The party slams the ground, revealing a Mega-Ether and 50 Munny |
 |
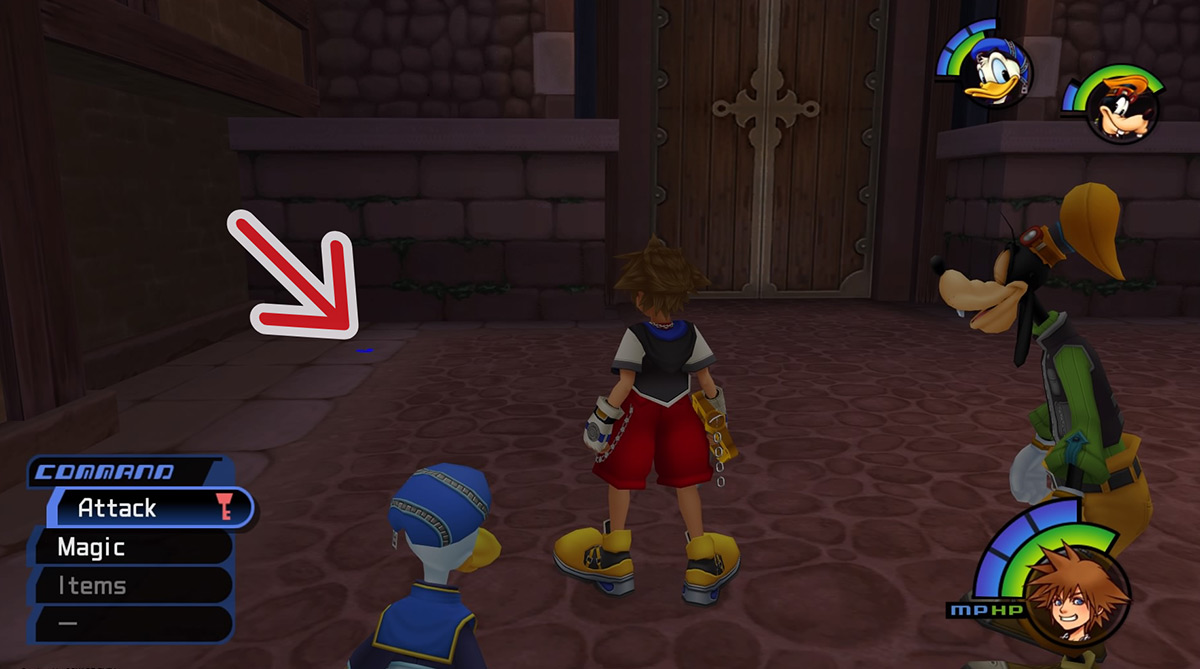
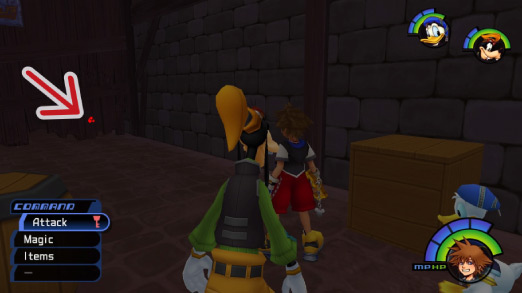
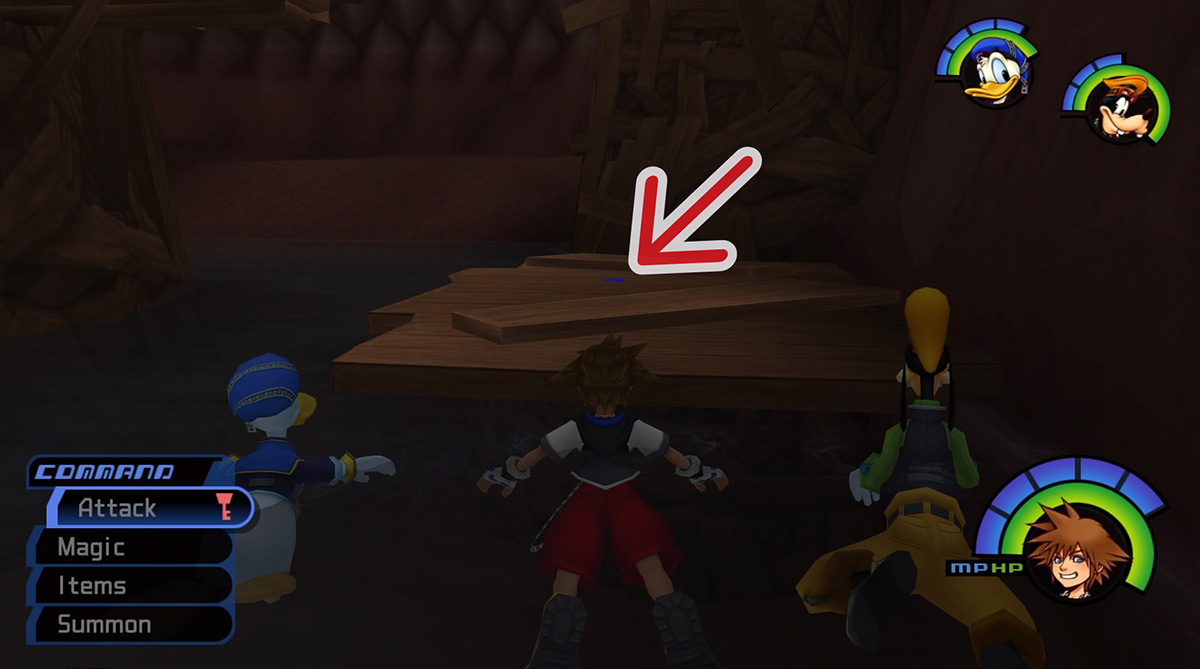
| Red |
First District – On a wooden barricade at the end of the alley behind the Item Shop |
The party crashes into the barricade, opening a passageway to Puppies 4-6 |
 |
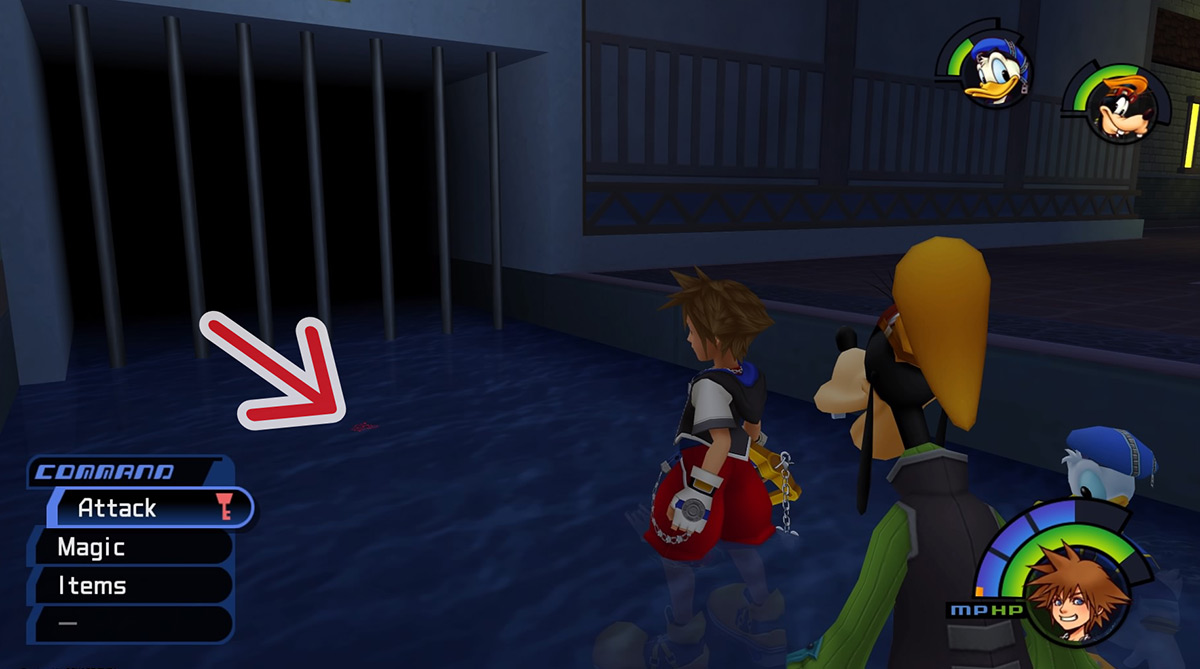
| Red |
Alleyway – In the water, near the grate |
The party crashes into the grate, creating an entrance to the Secret Waterway |
 |
| Red |
Second District – On some wooden planks on the roof of the Gizmo Shop |
The party crashes into the planks, opening a path to the bell tower |
 |
| Green |
Accessory Shop – On the floor in the center of the room |
The party reaches up and drops a ladder from the ceiling, granting them access to the Item Workshop |
 |
| Yellow |
Mystical House – Behind the house, near the stack of crates |
The party pushes the crates over, forming a ramshackle staircase leading to an AP Up |
 |
| White |
Secret Waterway – On the ground near Leon’s training spot |
The party combines the power of their weapons to summon an Orichalcum |
 |
Wonderland
| Color |
Location |
Outcome |
Screenshot |
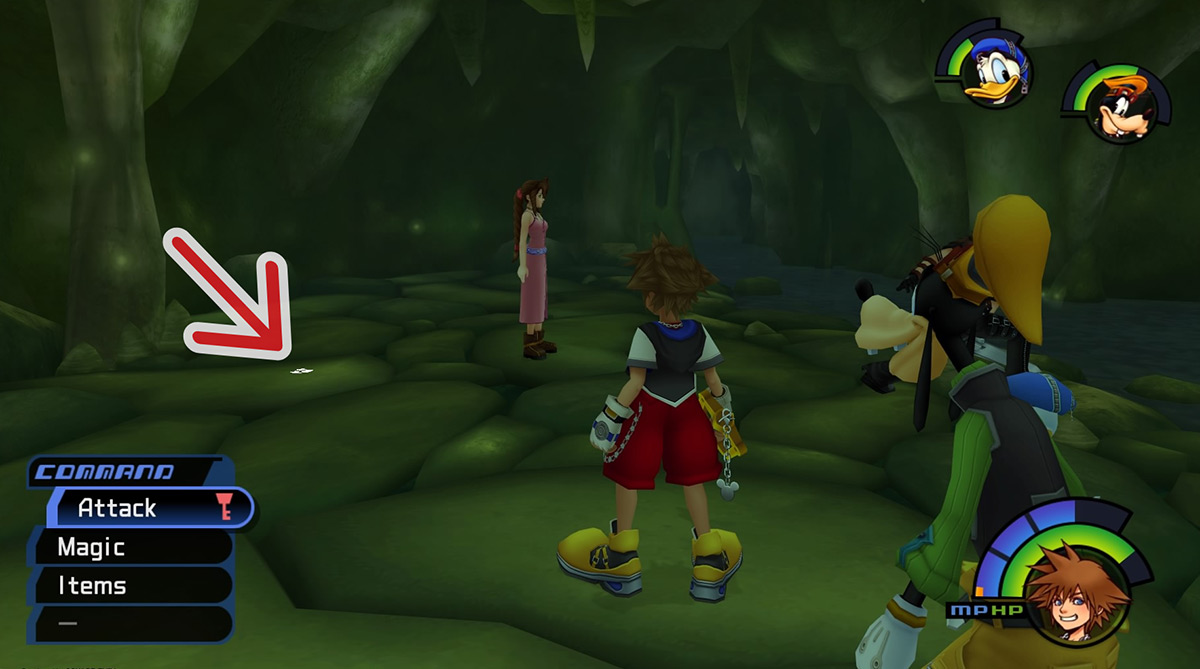
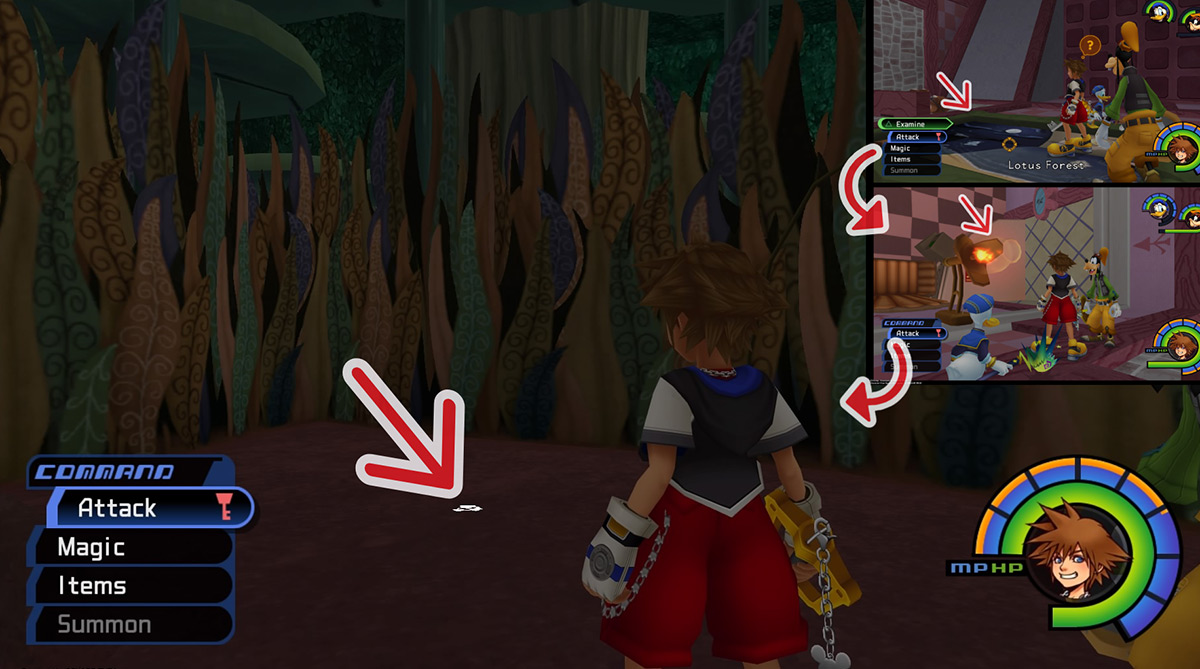
| Blue |
Lotus Forest – In a semi-enclosed area on the east side, near the yellow mushrooms |
The party slams the ground, revealing an Ether, a Potion, a Tent, and some MP orbs |
 |
| Blue |
Lotus Forest – In a hidden area to the west; accessed by using a flower to grow to normal size, then throwing the boulder into the pond to make platforms appear; accessible only after Alice’s trial |
The party slams the ground, revealing a Camping Set and some MP orbs |
 |
| Green |
Rabbit Hole – Near the save point |
The party reaches up to pull an Elixir out of an overhead fireplace |
 |
| Green |
Bizarre Room (Upright) – Inside the fireplace |
The party reaches up to pull a Mythril Shard out of the chimney |
 |
| White |
Lotus Forest – In the enclosed area accessed by examining the painting in the sideways Bizarre Room |
The party combines the power of their weapons to reveal the Lady Luck keyblade |
 |
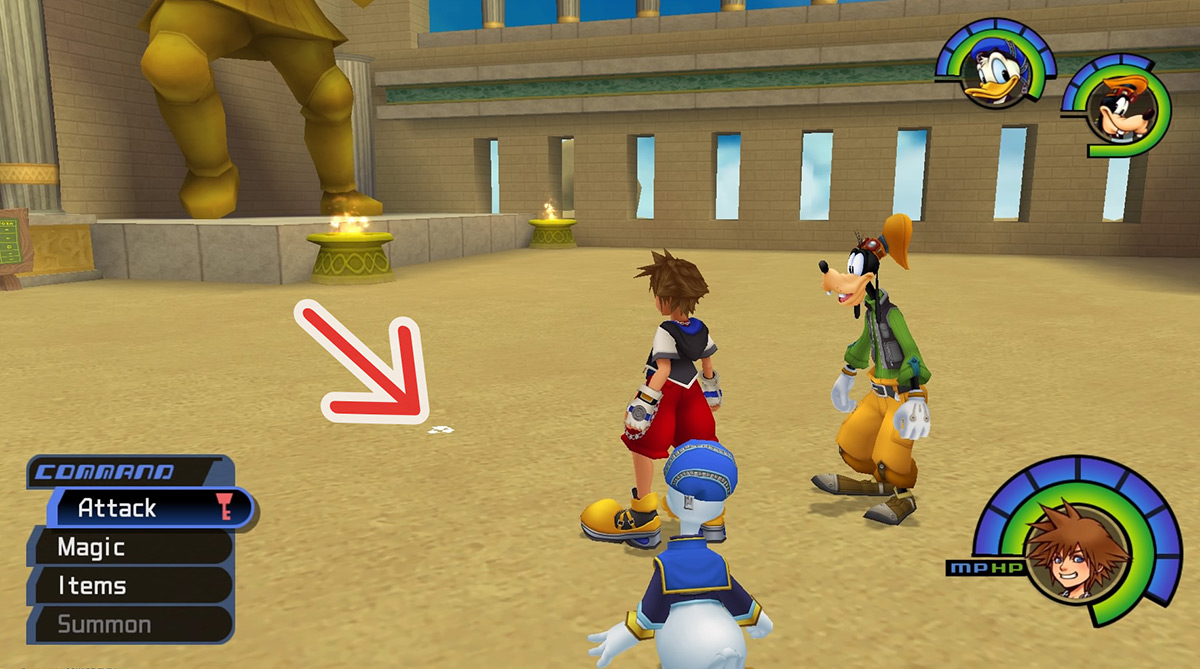
Olympus Coliseum
| Color |
Location |
Outcome |
Screenshot |
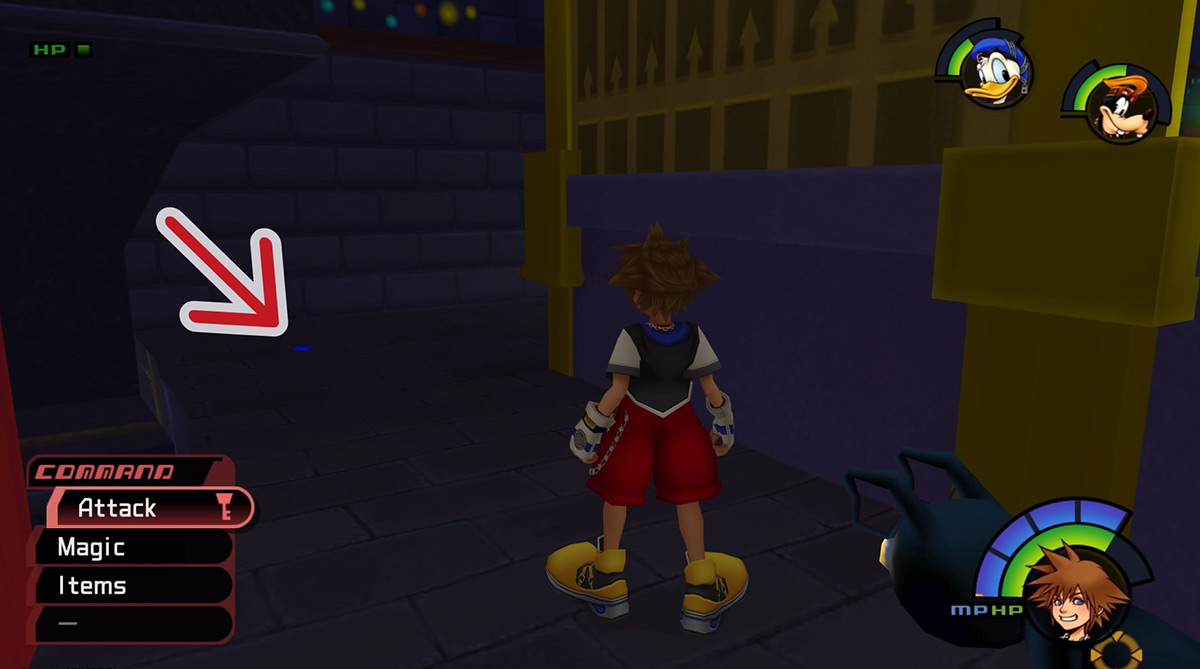
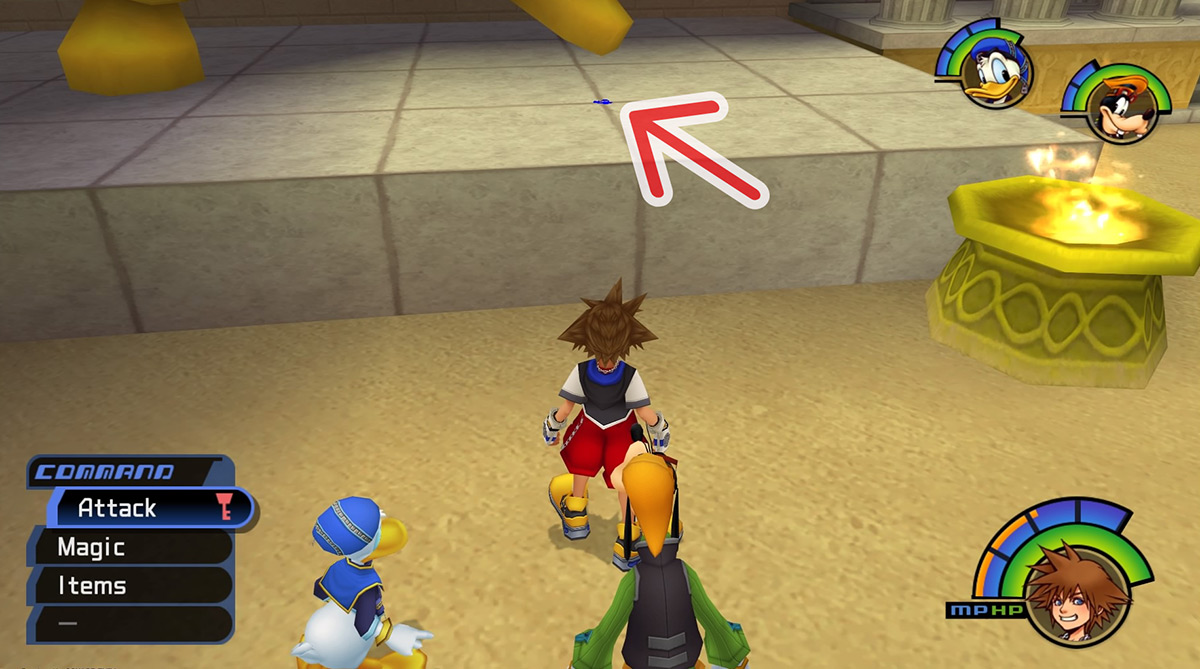
| Blue |
Coliseum Gates – In front of the western gladiator statue |
The party slams the ground, revealing a Mythril Shard |
 |
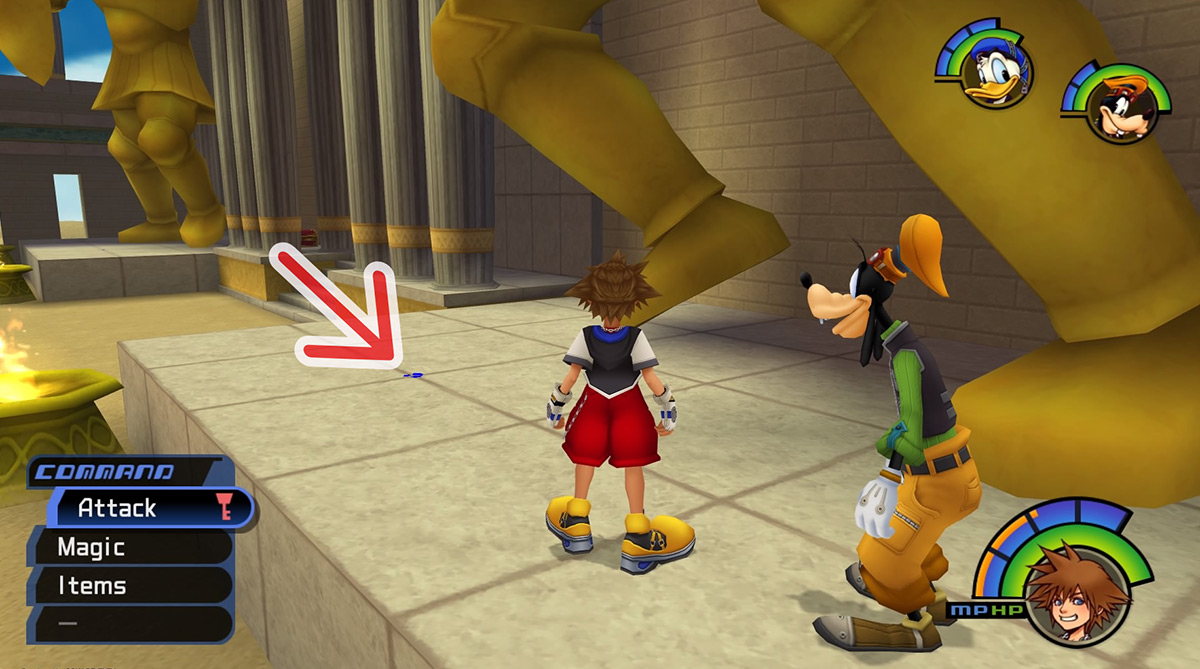
| Blue |
Coliseum Gates – In front of the eastern gladiator statue |
The party slams the ground, revealing Puppies 22-24 |
 |
| Green |
Coliseum Gates – In the southwestern corner, between two braziers |
The party reaches up to obtain a Mythril |
 |
| Yellow |
Lobby – In front of the massive stone block by the eastern wall |
The party pushes the stone block aside, revealing the Coliseum’s Keyhole |
 |
| White |
Coliseum Gates – In the center of the area |
The party combines the power of their weapons to summon the Violetta staff |
 |
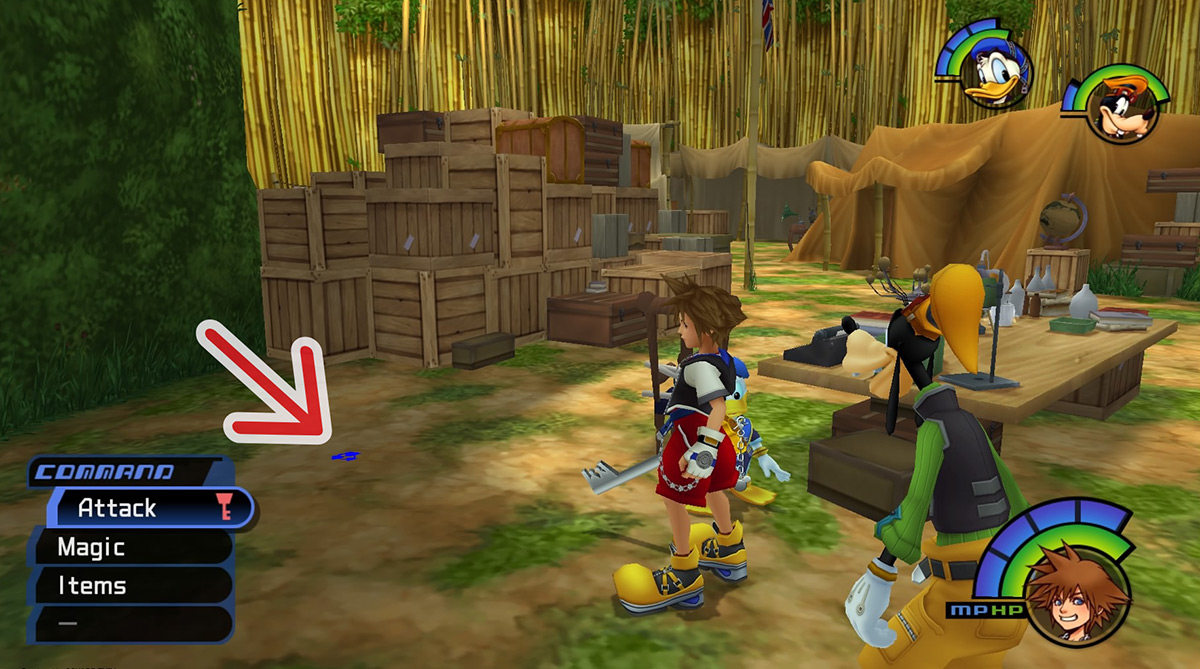
Deep Jungle
| Color |
Location |
Outcome |
Screenshot |
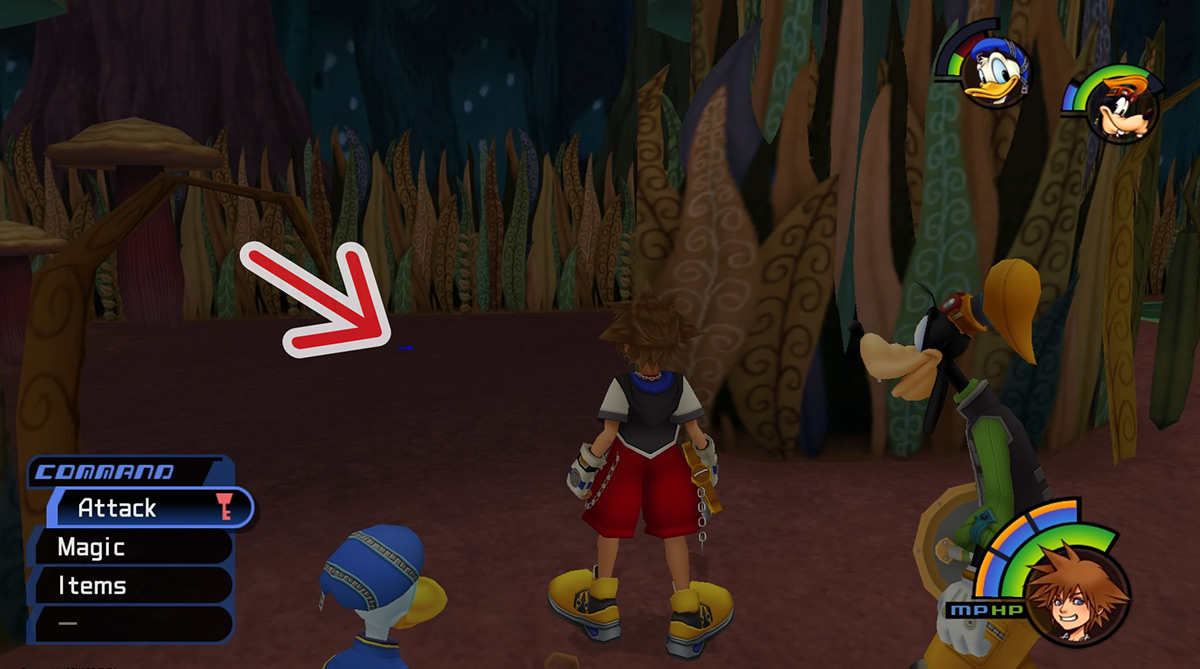
| Blue |
Camp – Near the table of lab equipment |
The party slams the ground, revealing Puppies 34-36 |
 |
| Blue |
Climbing Trees – Directly in front of the exit to the Tree House |
The party slams the ground, revealing a Thundara-G |
 |
| Green |
Treetop – In the center of the area; heavily camouflaged by the leaves underfoot |
The party reach up to obtain a Mythril Shard and some HP orbs |
 |
| White |
Waterfall Cavern – On the ground in the center of the area |
The party combines the power of their weapons to summon an Orichalcum |
 |
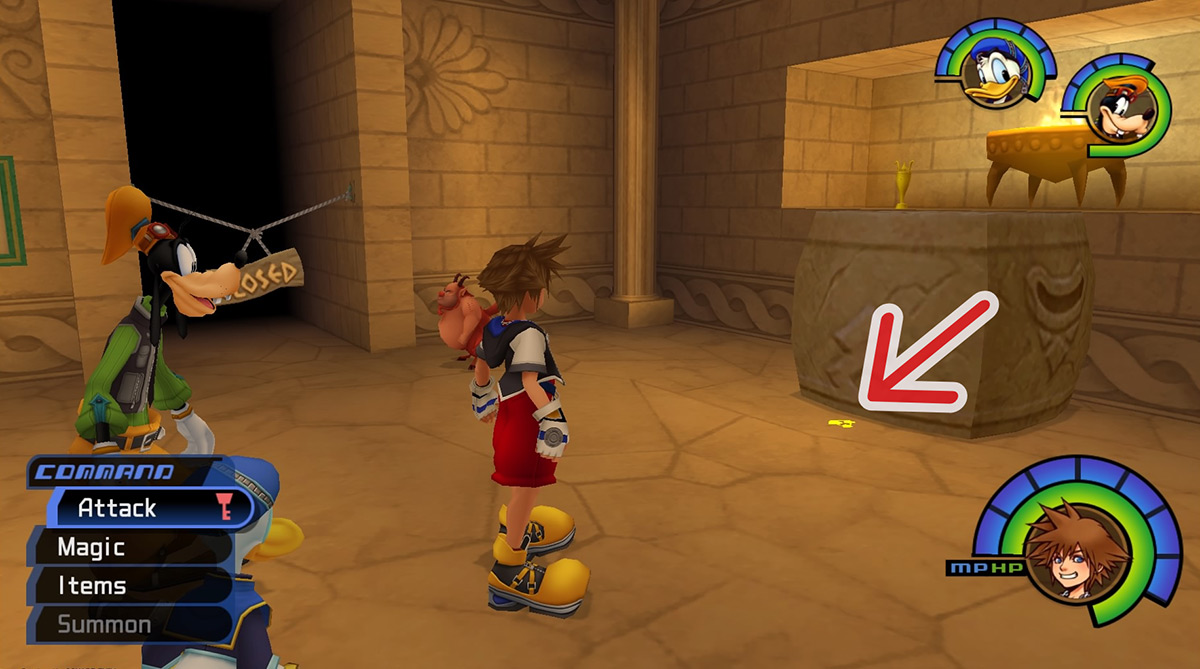
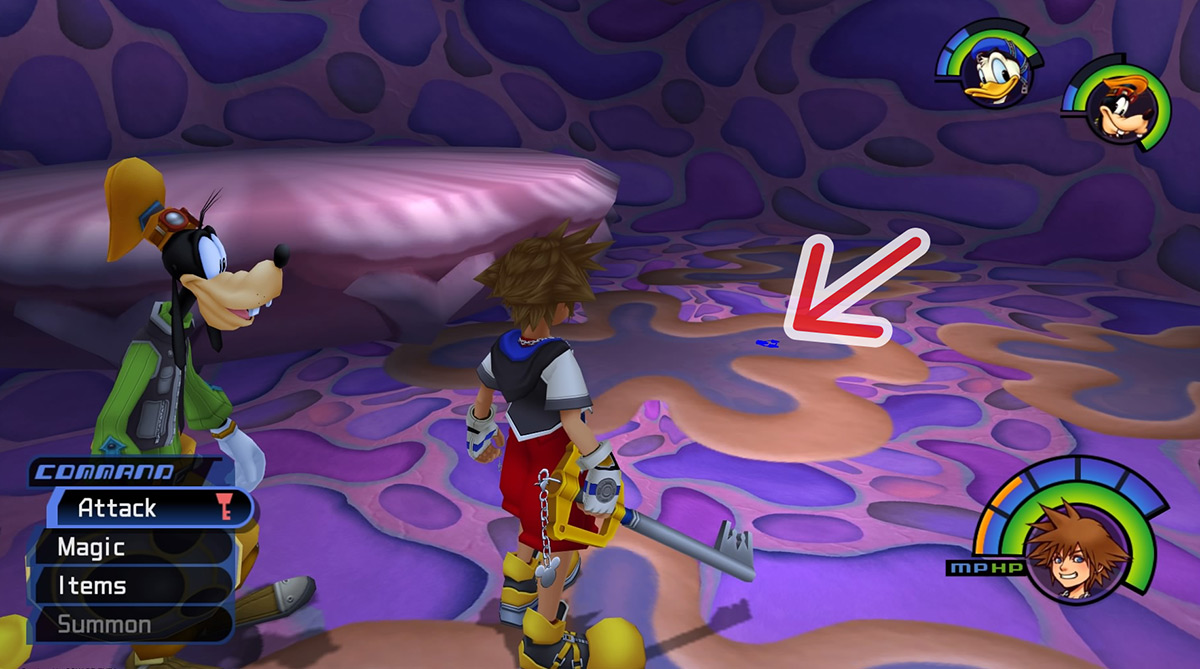
Agrabah
| Color |
Location |
Outcome |
Screenshot |
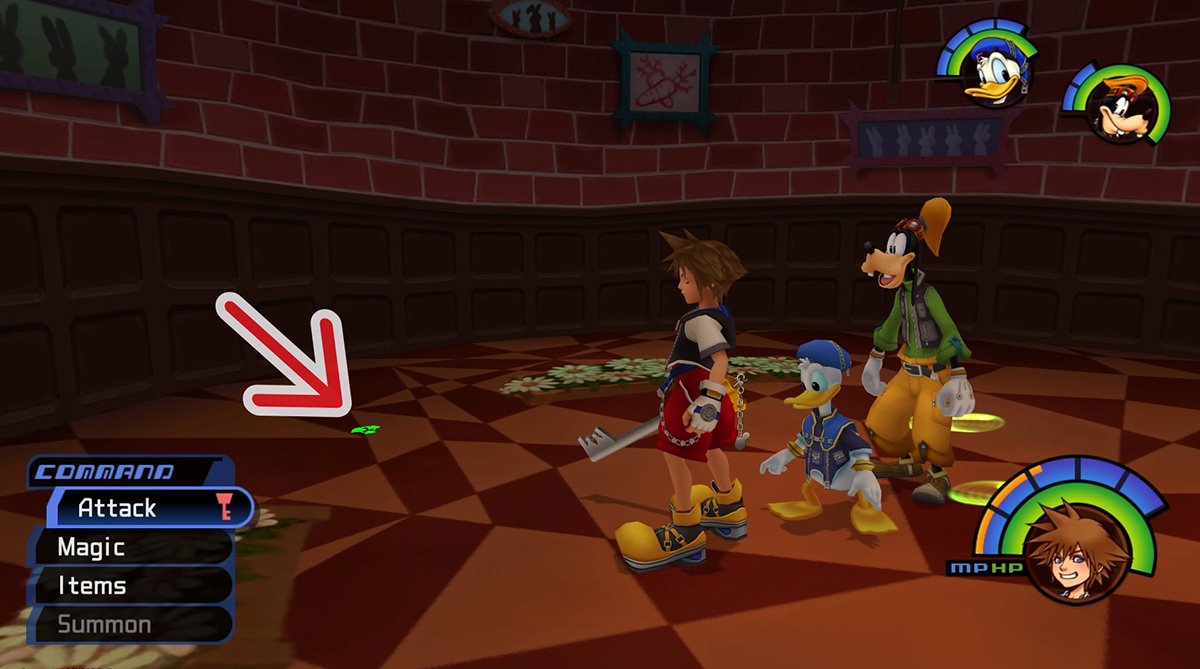
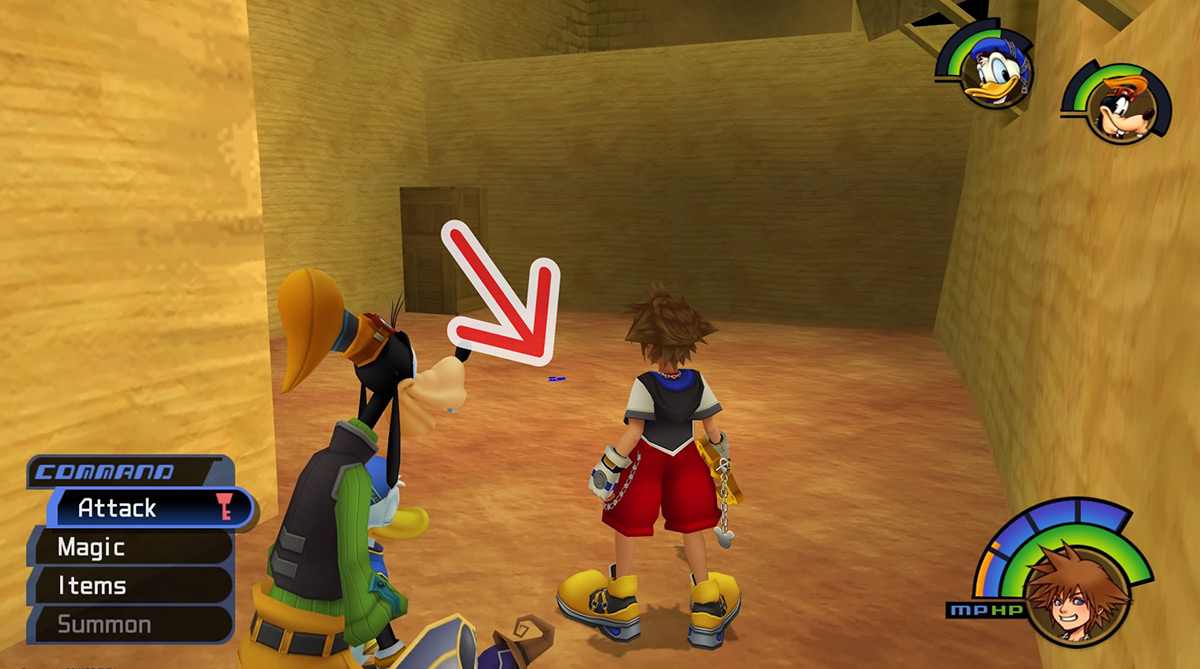
| Blue |
Bazaar – On the ground in the center of the area |
The party slams the ground, revealing a Mega-Ether and 200 Munny |
 |
| Blue |
Cave of Wonders: Dark Cavern – On the platform where the three staircases meet |
The party slams the ground, revealing a Thundara-G |
 |
| Red |
Cave of Wonders: Treasure Room – On the ground in front of the stone statue among the western piles of treasure |
The party crashes into the stone statue, knocking a Mythril Shard and 333 Munny loose |
 |
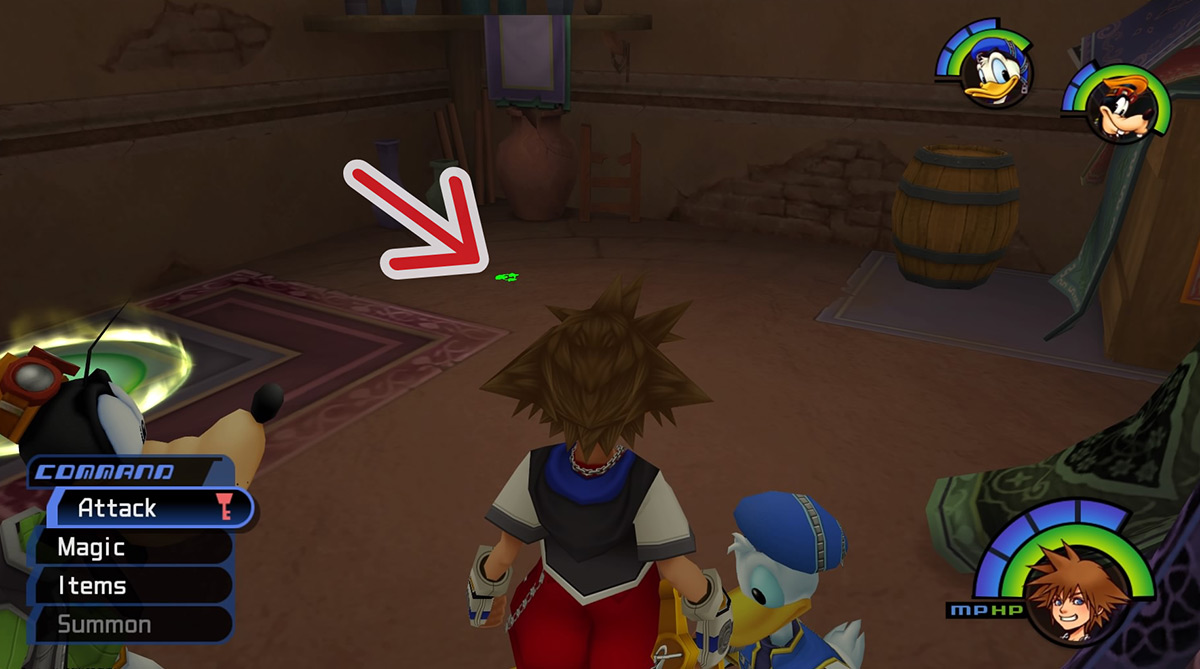
| Green |
Storage Room – On the floor near the opposite corner from the entrance |
The party reaches up and knocks an AP Up off of a high shelf |
 |
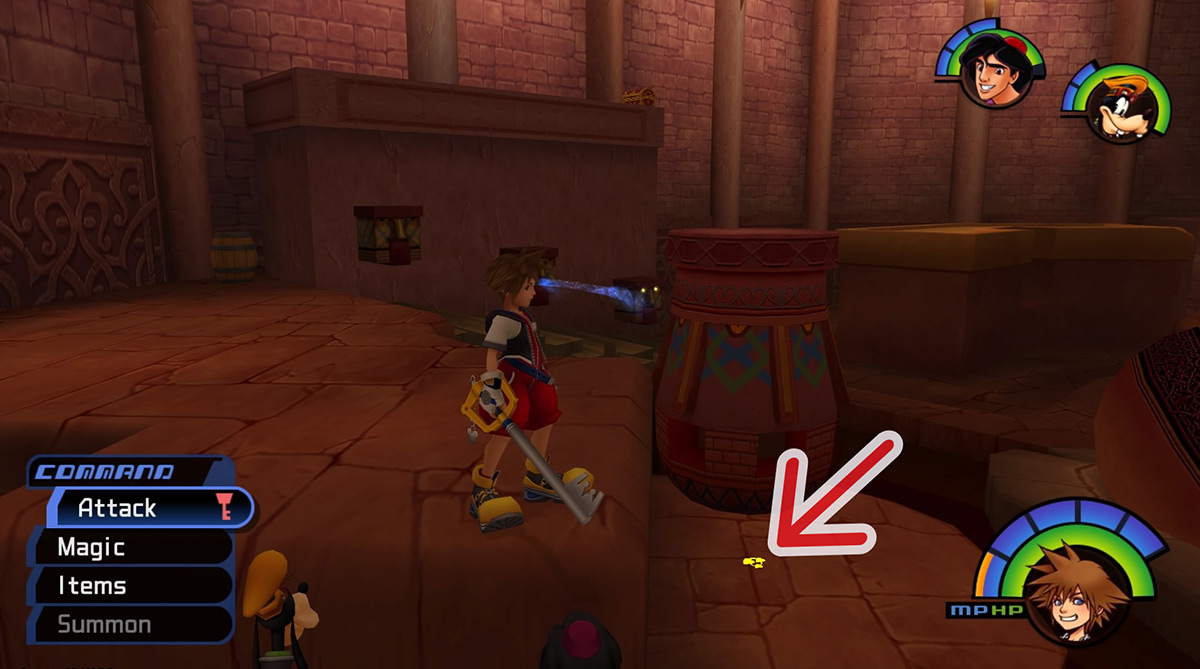
| Yellow |
Cave of Wonders: Hall – In front of a statue near the boulder path |
The party pushes the statue off the ledge, creating a path in the Silent Chamber that leads to the Hidden Room |
 |
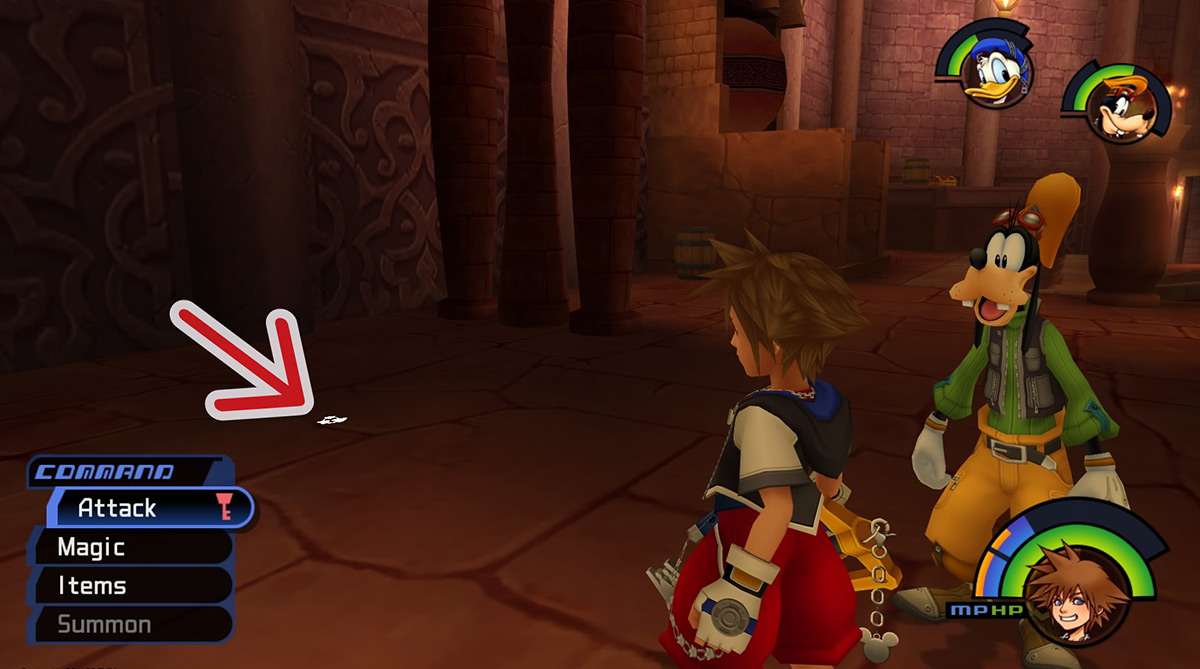
| White |
Cave of Wonders: Entrance – Just in front of the entrance, on the left |
The party combines the power of their weapons to summon an Ifrit Belt |
 |
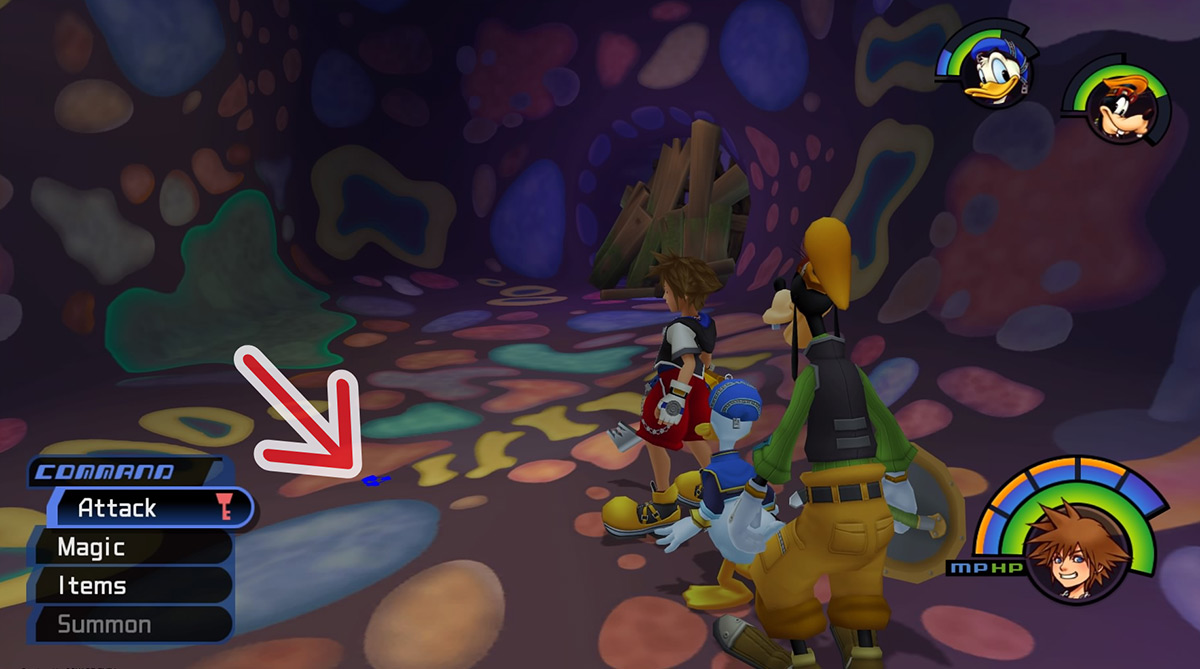
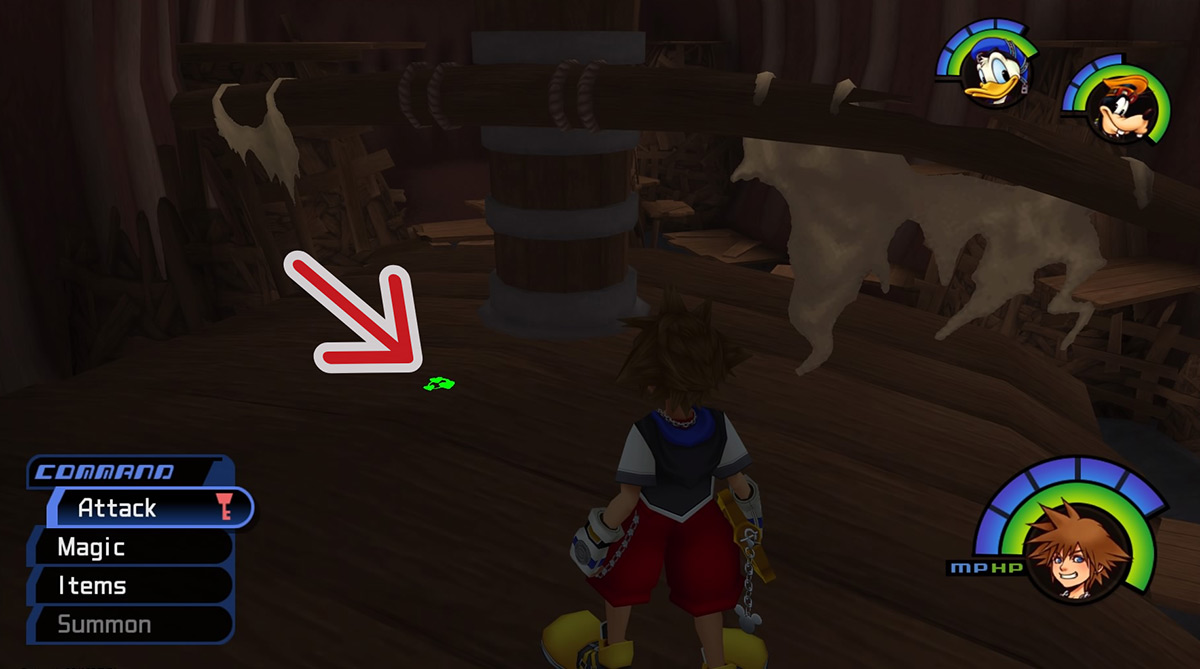
Monstro
| Color |
Location |
Outcome |
Screenshot |
| Blue |
Mouth – On a wooden platform to the northeast that becomes accessible after the water is lowered |
The party slams the wooden platform, revealing two Potions, a Cottage, and 50 Munny |
 |
| Blue |
Throat – In the center of the ground floor |
The party slams the ground, revealing a Mythril Shard and 100 Munny |
 |
| Blue |
Chamber 5 – In the center of the ground floor |
The party slams the ground, revealing a Cottage and 333 Munny |
 |
| Green |
Mouth – On the roof of Gepetto’s ship’s cabin; requires High Jump |
The party reaches up and knocks a Mythril Shard down from the broken mast |
 |
| White |
Chamber 6 – At one end of the chamber, fairly close to the higher entrance to Chamber 5 |
The party uses the power of their weapons to summon a Dark Matter |
 |
Atlantica
| Color |
Location |
Outcome |
Screenshot |
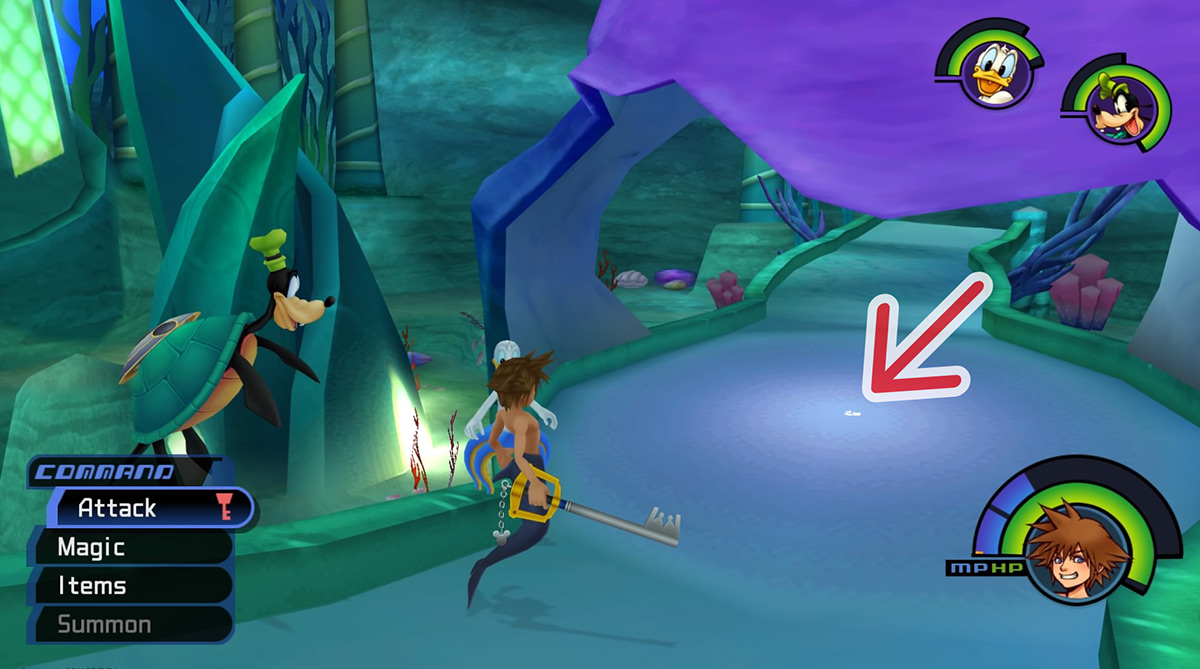
| White |
Triton’s Palace – On the walkway, under the giant purple shell |
The party uses the power of their weapons to summon an Orichalcum |
 |
Halloween Town
| Color |
Location |
Outcome |
Screenshot |
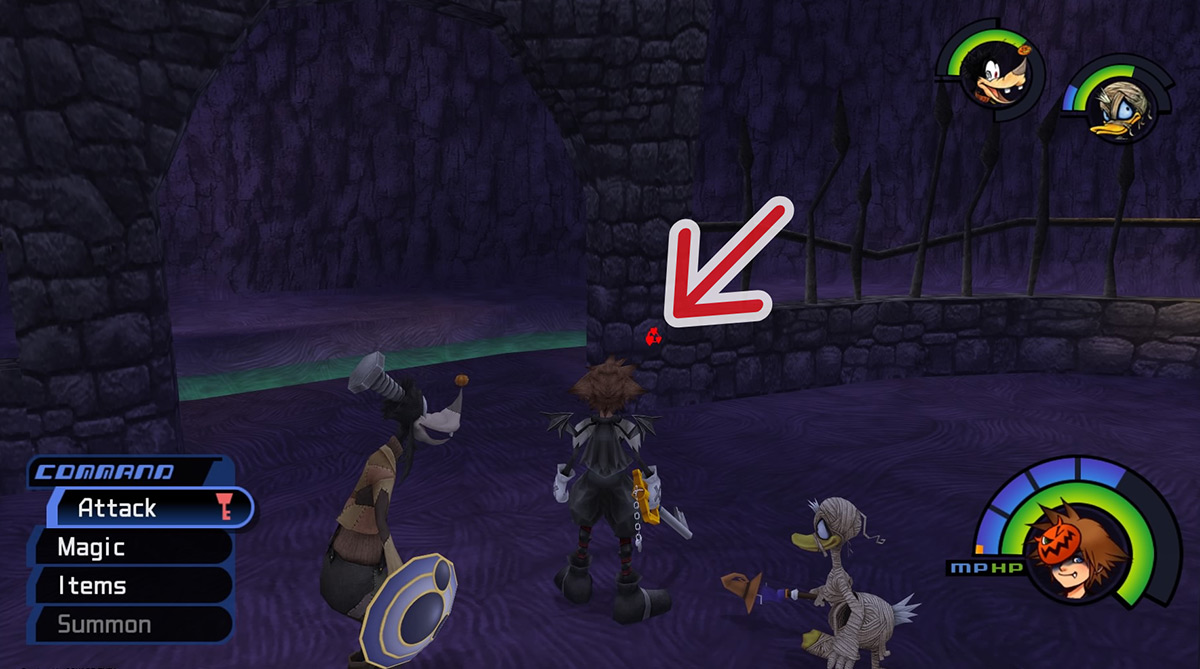
| Red |
Oogie’s Manor – On the stone archway at the foot of the manor |
The party crashes into the stone archway, knocking down a Mythril Shard |
 |
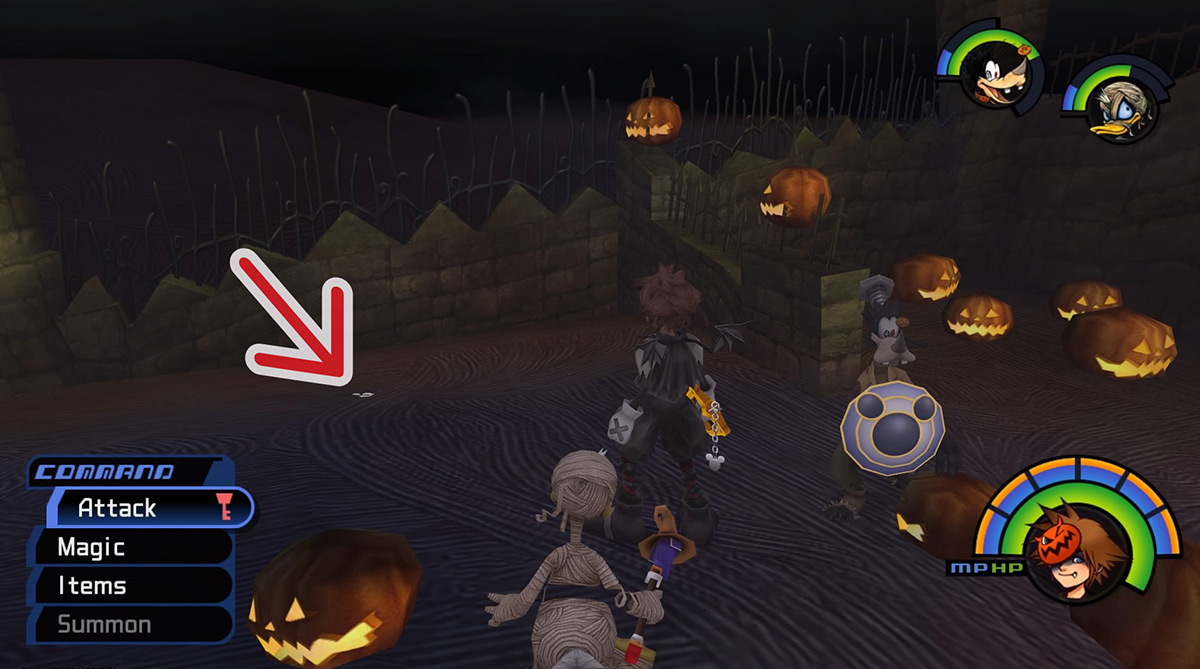
| White |
Moonlight Hill – On the ground beside the front of the hill |
The party combines the power of their weapons to reveal Puppies 67-69 |
 |
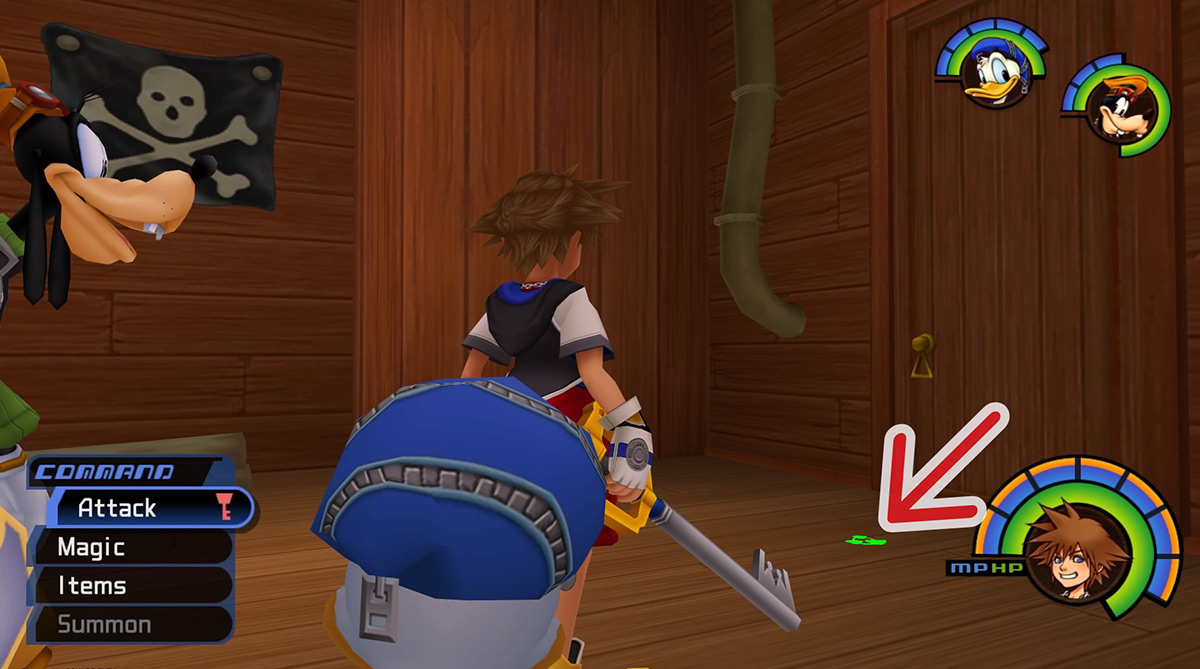
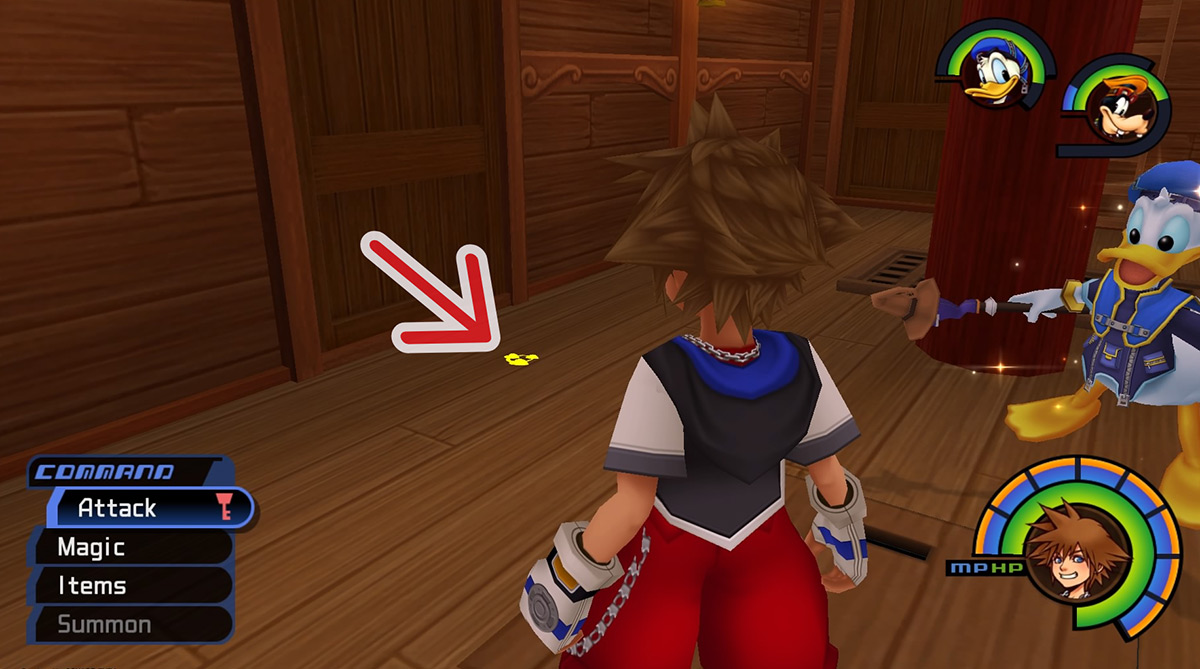
Neverland
| Color |
Location |
Outcome |
Screenshot |
| Green |
Ship: Cabin – In the center of the room |
The party reaches up and knocks a ladder down, granting them access into the Captain’s Cabin |
 |
| Yellow |
Ship: Hold – In front of the door to the western room |
The party pushes the door open, granting access to several treasure chests |
 |
| White |
Pirate Ship – On the floor near the steering wheel |
The party combines the power of their weapons to reveal Puppies 67-69 |
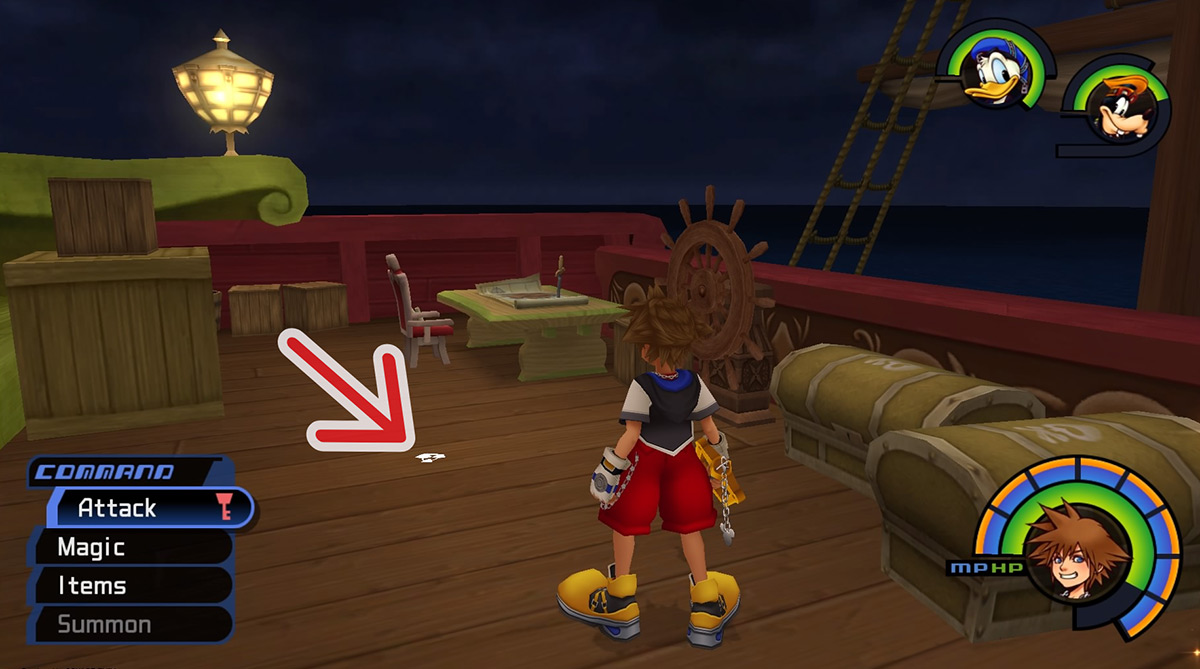 |
Hollow Bastion
| Color |
Location |
Outcome |
Screenshot |
| Blue |
Great Crest – On the ground directly in front of the large lift platform’s stopping point |
The party slams the ground, revealing 2 Cottages, a Megalixer, and some MP orbs |
 |
| Blue |
Dungeon – Near the candelabra on the table |
The party slams the floor, revealing a Mega-Ether, a Mega-Potion, a Cottage, and some HP orbs |
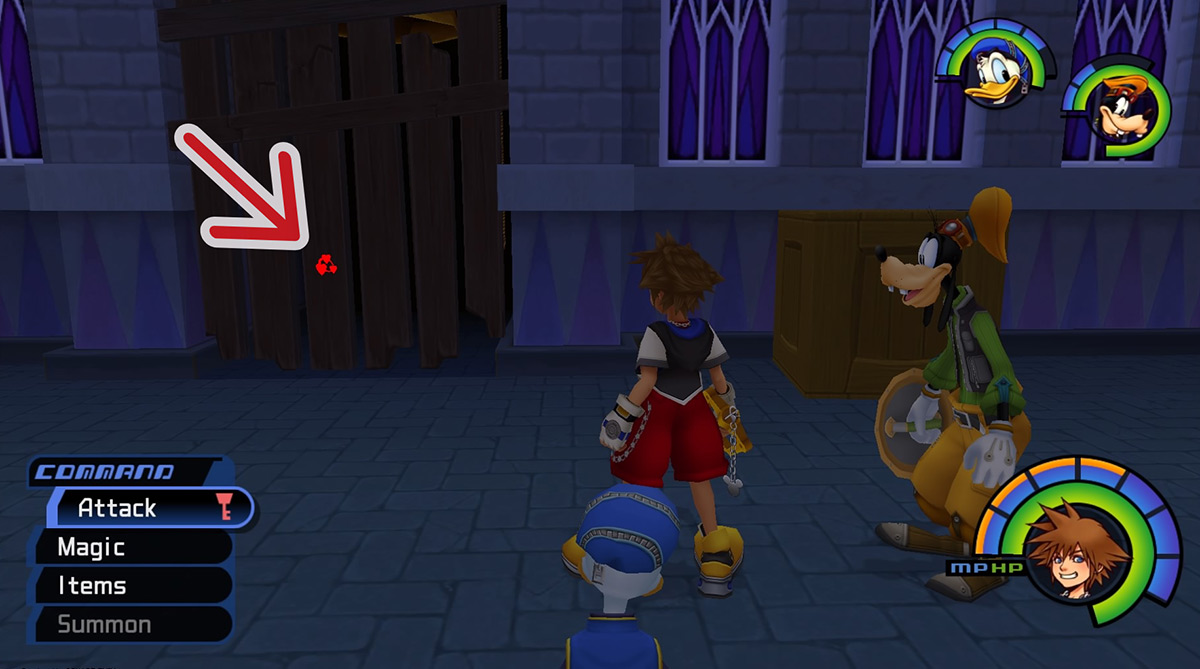
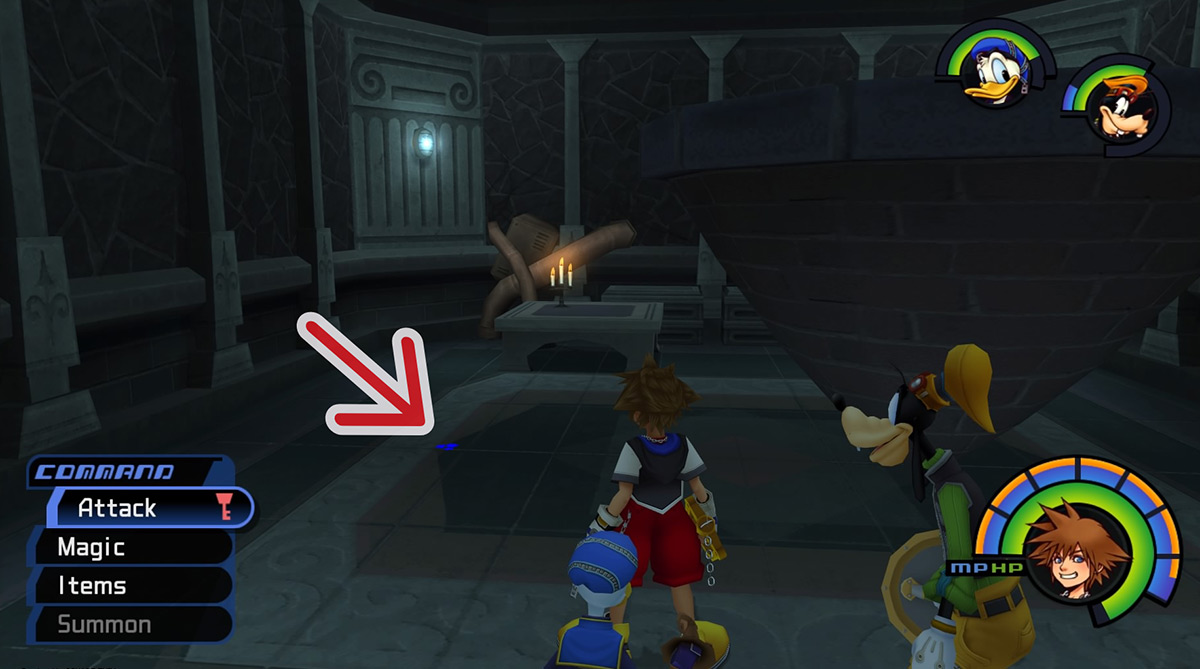 |
| Red |
Entrance Hall – In front of the tusked statue on the second floor |
The party crashes into the statue and knocks it to the floor, cracking it open to reveal an Emblem Piece |
 |
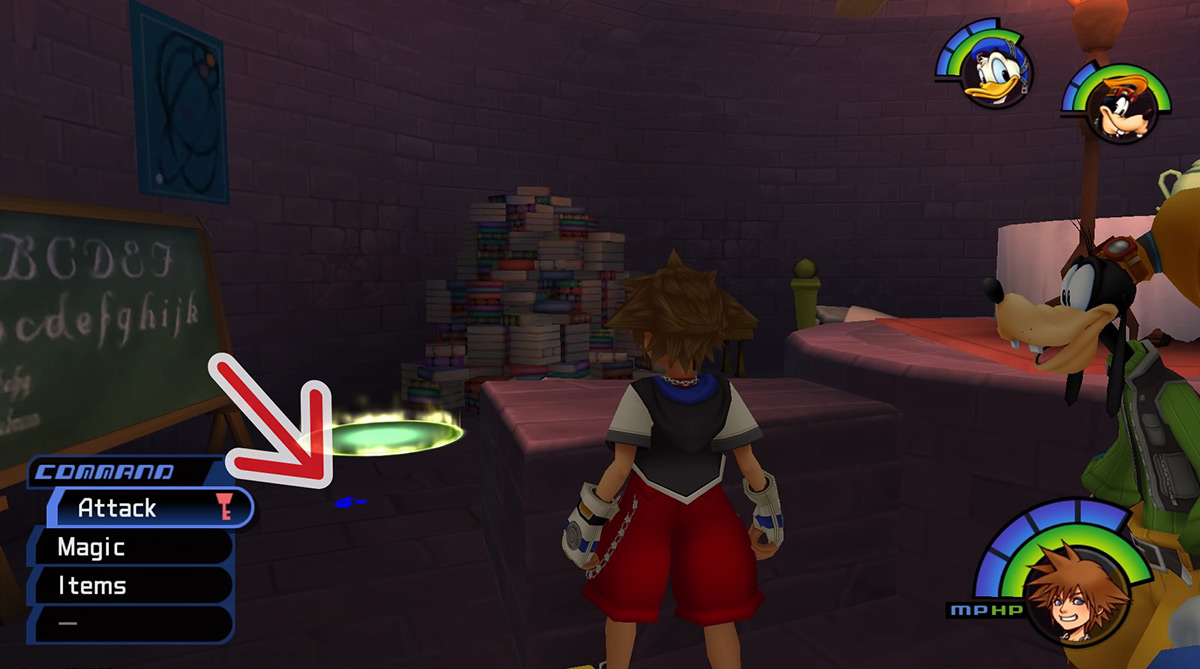
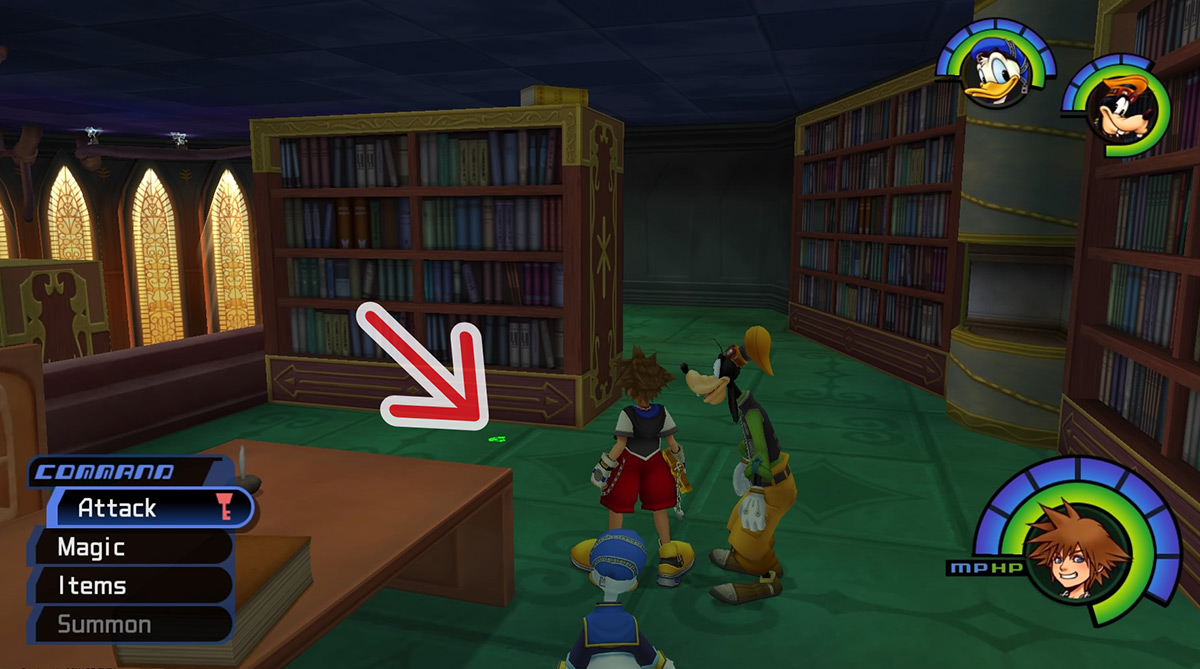
| Green |
Library – On the second floor, near the save point |
The party climbs up and grabs Azal Vol. 3 off of a bookcase |
 |
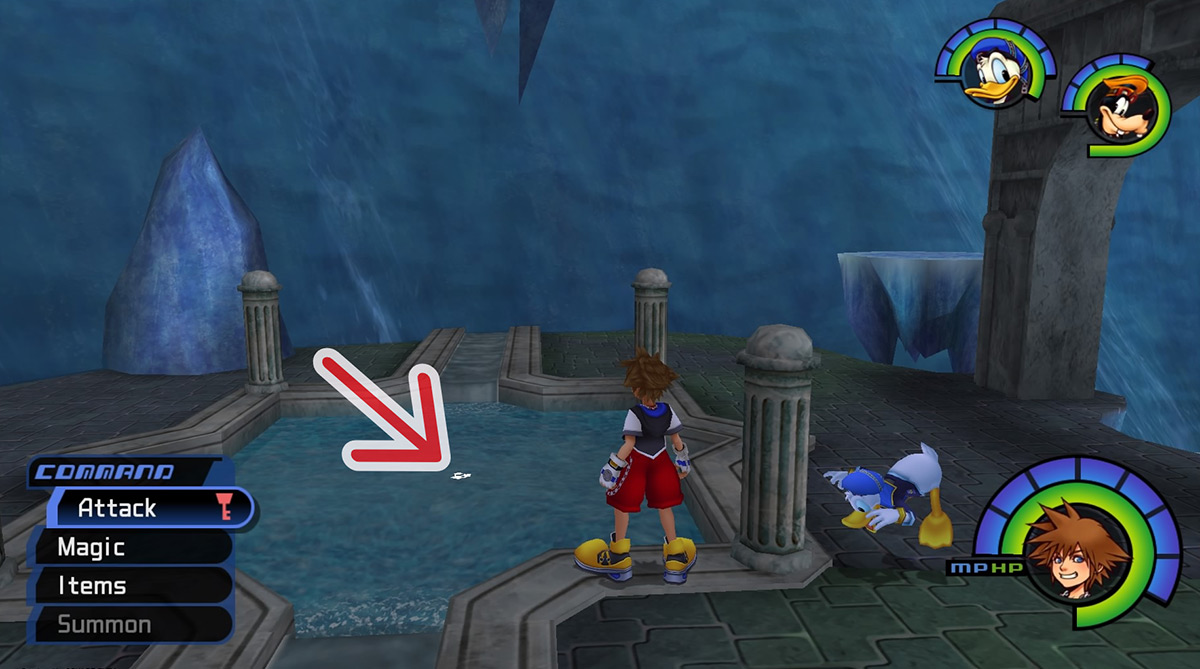
| White |
Rising Falls – On the platform with the stone archway, in the shallow pool |
The party combines the power of their weapons to summon a Thundaga-G |
 |